
GrowWeedEasy.com
You are using an out of date browser. It may not display this or other websites correctly.
You should upgrade or use an alternative browser.
You should upgrade or use an alternative browser.
How I average a pound per plant
- Thread starter BU2B
- Start date
-
- Tags
- lb per plant

In my opinion, yes. Companies are not dumb, the recommended amount on the label is generally the maximum you can give your plants with no ill effects. I always start low. If a plant lets me know it needs more nutrients I have 1/2 to 1/3 dosage I can increase if needed. Nebula really helped it click for me when she described nutrients as multivitamins with environment and light as the major food sources. Giving your kids more multivitamins wont make them healthier (and will likely cause more harm than good), as the multivitamin is intended to fill the gaps in needed nutrients and minerals NOT as your child's major food source. To be honest I have NEVER had to add more full spectrum nutrients, though I have added cal/mag on occasion when the girls request it.

bboyfromwayback
Well-known member
Holy hell those are manifolds? I’ve been using Nebula’s manifold my last couple grows as well and really like it. All training is done within 5wks of sprout and I’ve been averaging 5oz of quality bud per plant. I’m definitely interested where we go from here because your plants are bigger. Longer veg than I’m doing but still, monster plants! I’m guessing there’s another topping or two to take place, possibly some supercropping. Either way I’m looking forward to following along.


Shankemdirty
New member
I was Actually following the bottle on the Gh trio same as you with calimagic and i got a ppm meter and my ppm/ec reading was off the charts i have halfed everything and it basically makes them seem even healthier plus i am saving half of my nutrients now so that is hype.


Poppa
New member
Let me see if I can say this in a way we all see the same thing. We all see the same thing when it comes to needing higher Nitrogen (N) in veg and low in flower and high Phosphorus (P) and Potassium (K) in flower. On nutrient bottles there are 3 numbers N-P-K. What I believe growell and what I myself thought while looking at the 3 Floa trio bottles and feed chart seemed off. If you take them at face values Micro 5-0-1 Gro 2-1-6 and Bloom 0-5-4 the chart says to increase the Micro with a high N and cut the Gro with a high K. So raising the unneeded N and lowering the needed K in flower doesn't make sense. It works and I figure increasing the Micro was more for the other nutrients over raising the N. Hope this makes sense I did hit my pipe as soon as I stopped working round here today. Ladders and roofs are not my friends at this age.

Obi-Wan
New member
You can still keep a balanced npk ratio increasing only micro and bloom. However if you increase grow and bloom without increasing micro, your trace nutrients will be out of balance because the micro contains all of trace nutrients. Technically you could eliminate the grow altogether and be perfectly fine.

oldjarhead100
New member
I start at a quarter then go up until I see a very little tip burn, since I've been using the same nutrients for years, this grow i've cut out everything but grow and bloom ,calmag. silica .so far plants are looking great
And the beat goes on (and the beat goes on)...
I have a sneaking suspicion that I am going to be done with the HOW TO part of this journal long before my current grow finishes up (just starting week 4 today). Should that be the case, and I'm quite certain it will be, please feel free to ask questions and make comments - even if I don't have the answer; someone on GWE will know and I will do my best to insure that questions are answered. I am not afraid to say, "I don't know", if in fact, I don't - but someone will know. e.g., I love how Poppa and others have already proven my point.
Last time on "How I average a pound per plant" we had gotten our plants up to a healthy 4 weeks old, topped it once and removed all leaves/branches below the initial Y cut - in this session we're going to get our training and the 'work' 95% complete.
As your plant grows you want to 'gently' fold down and restrain your two new branches so they are growing as horizontal as possible. As your plant grows new node sets will grow out. It will produce leaf nodes in sets - two horizontal and then two vertical. You want to remove all of the nodes that are facing downward. For example if your branch is growing nodes will appear rather like a "+" sign if viewed from the top (when growing vertical) or straight on from the end of the branch (when growing horizontal).
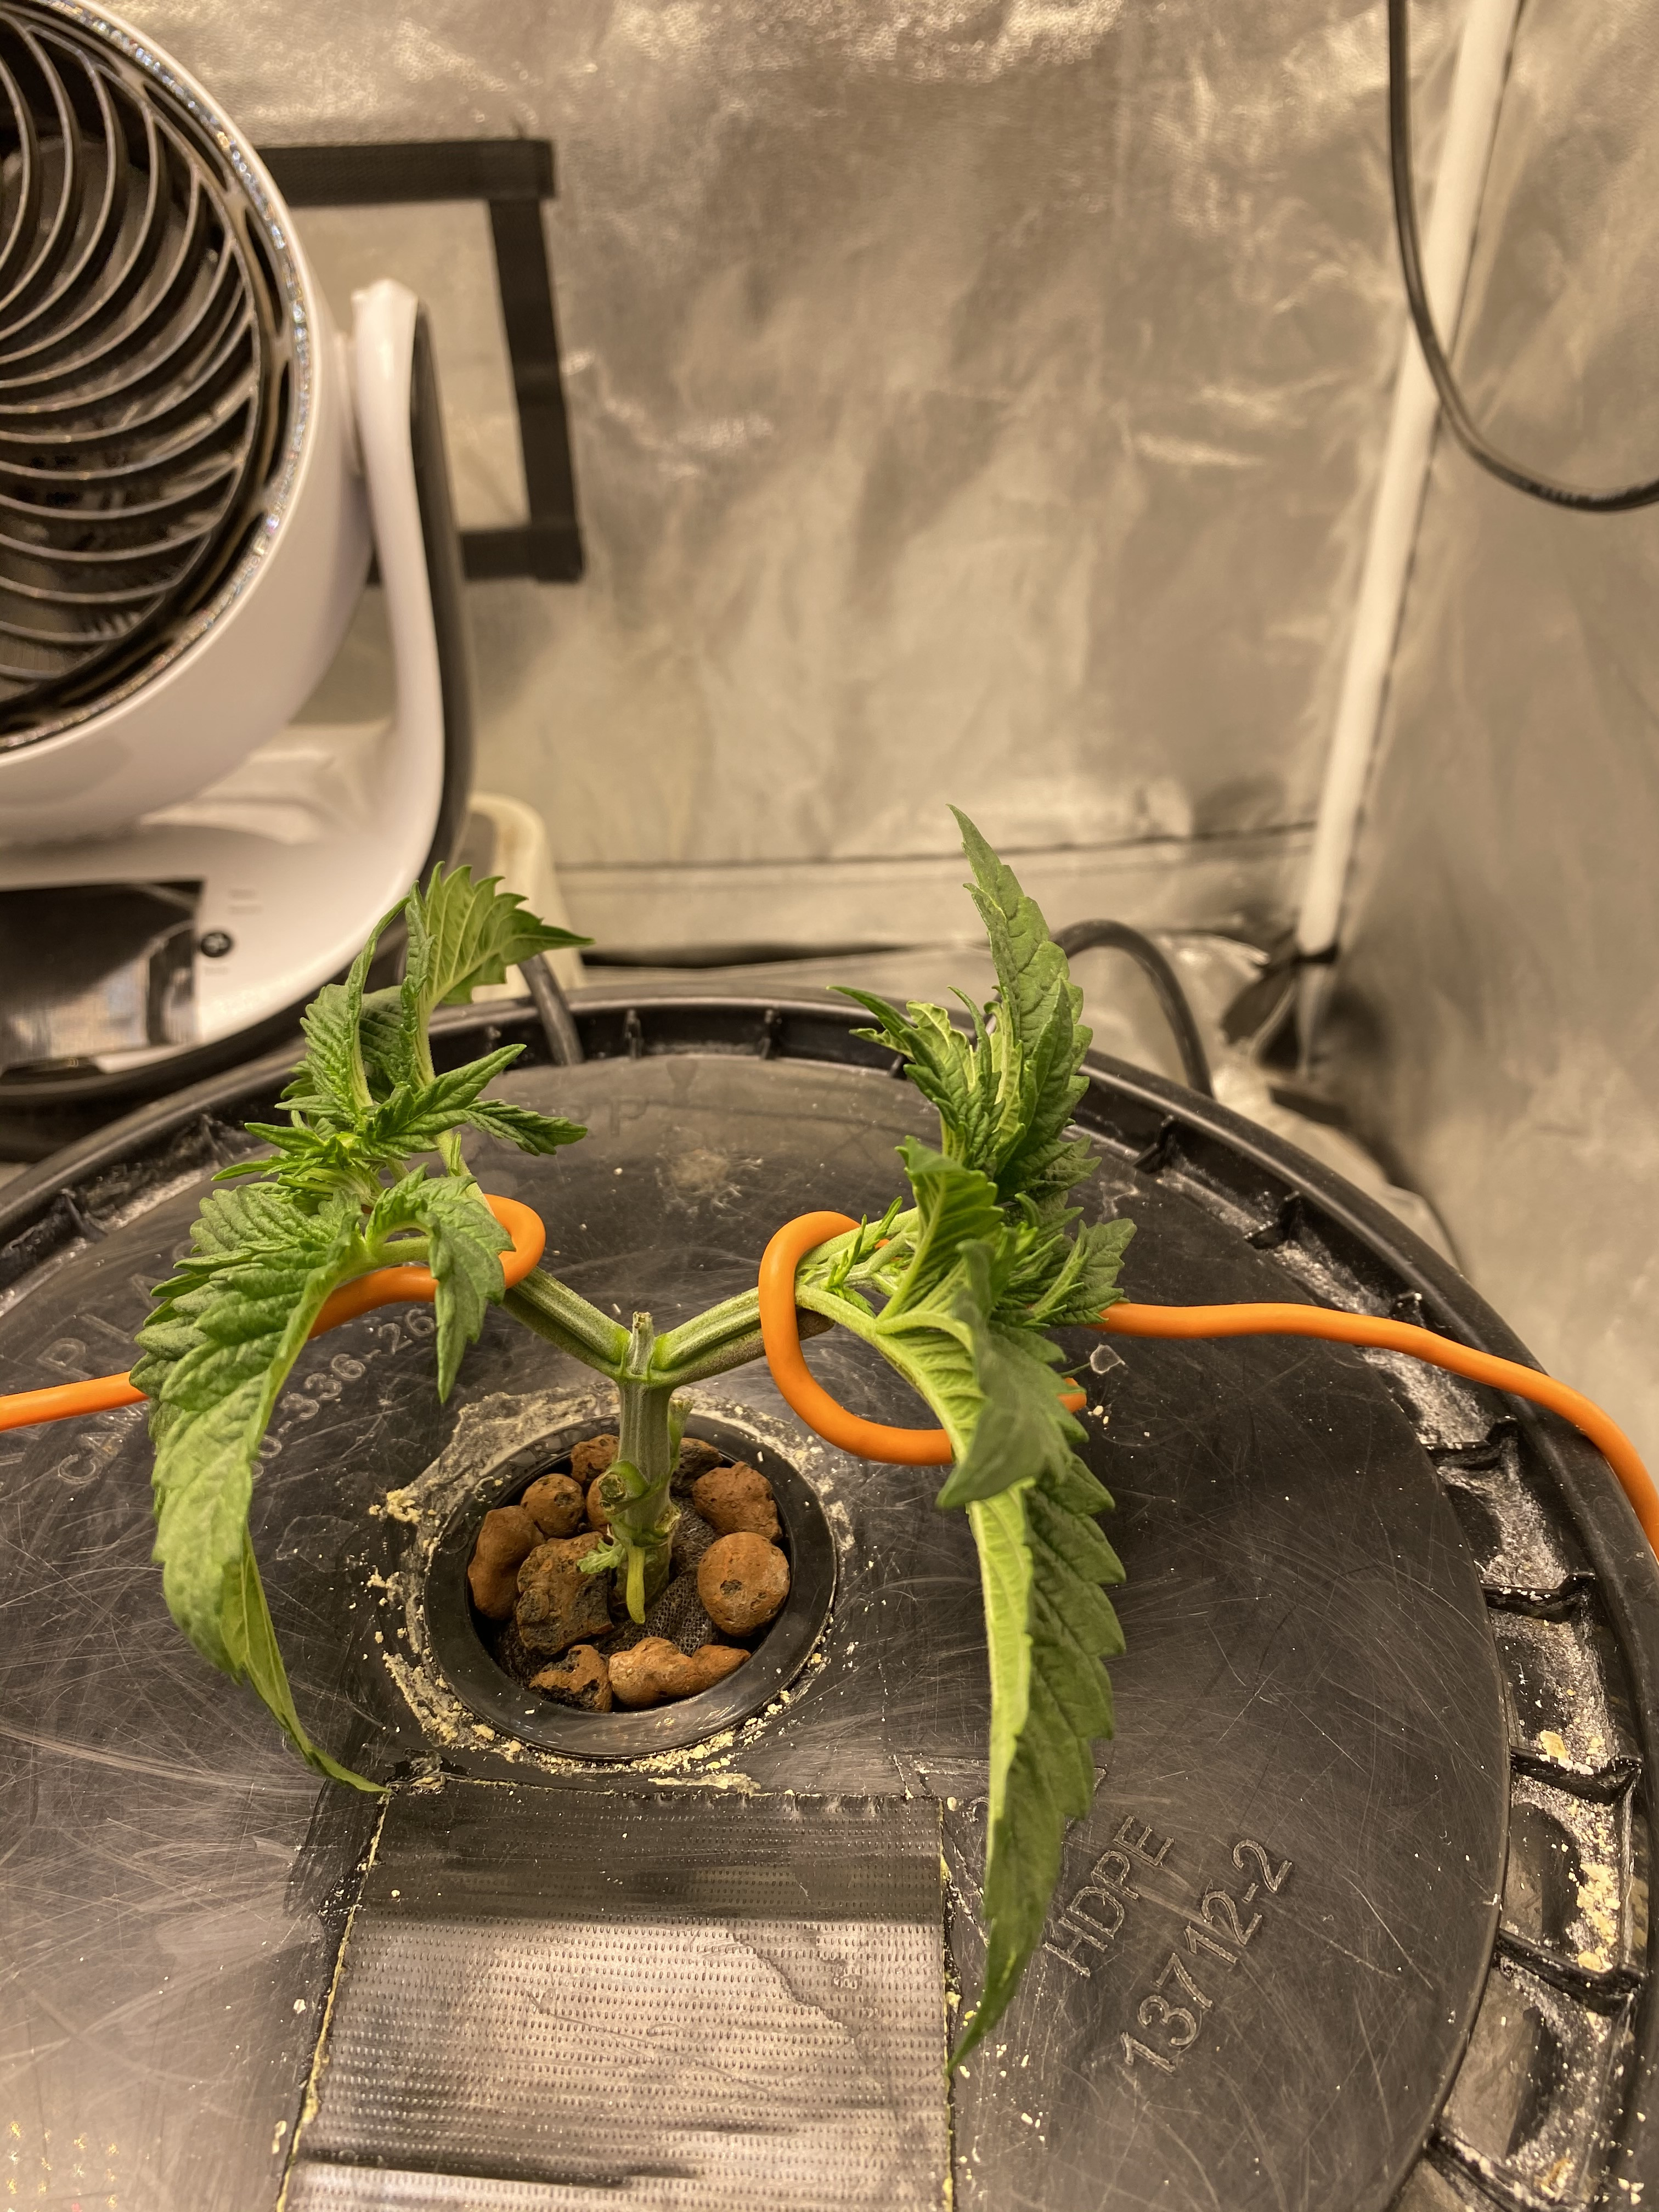
Unlike a traditional manifold, you want to leave all of the nodes/branches/leaves on your plant EXCEPT for those that grow downward. If viewed from the end of the branch your stem should look like and inverted "T". By the end of or during week 4 your plant should look similar to the one shown above.
As your plant continues to grow you want to keep it as horizontal as possible without breaking or damaging your two new branches. Remove all growth on the underside of your two branches. As the plant develops you want to remove the large fan leaf that will be over the second node growing upward.
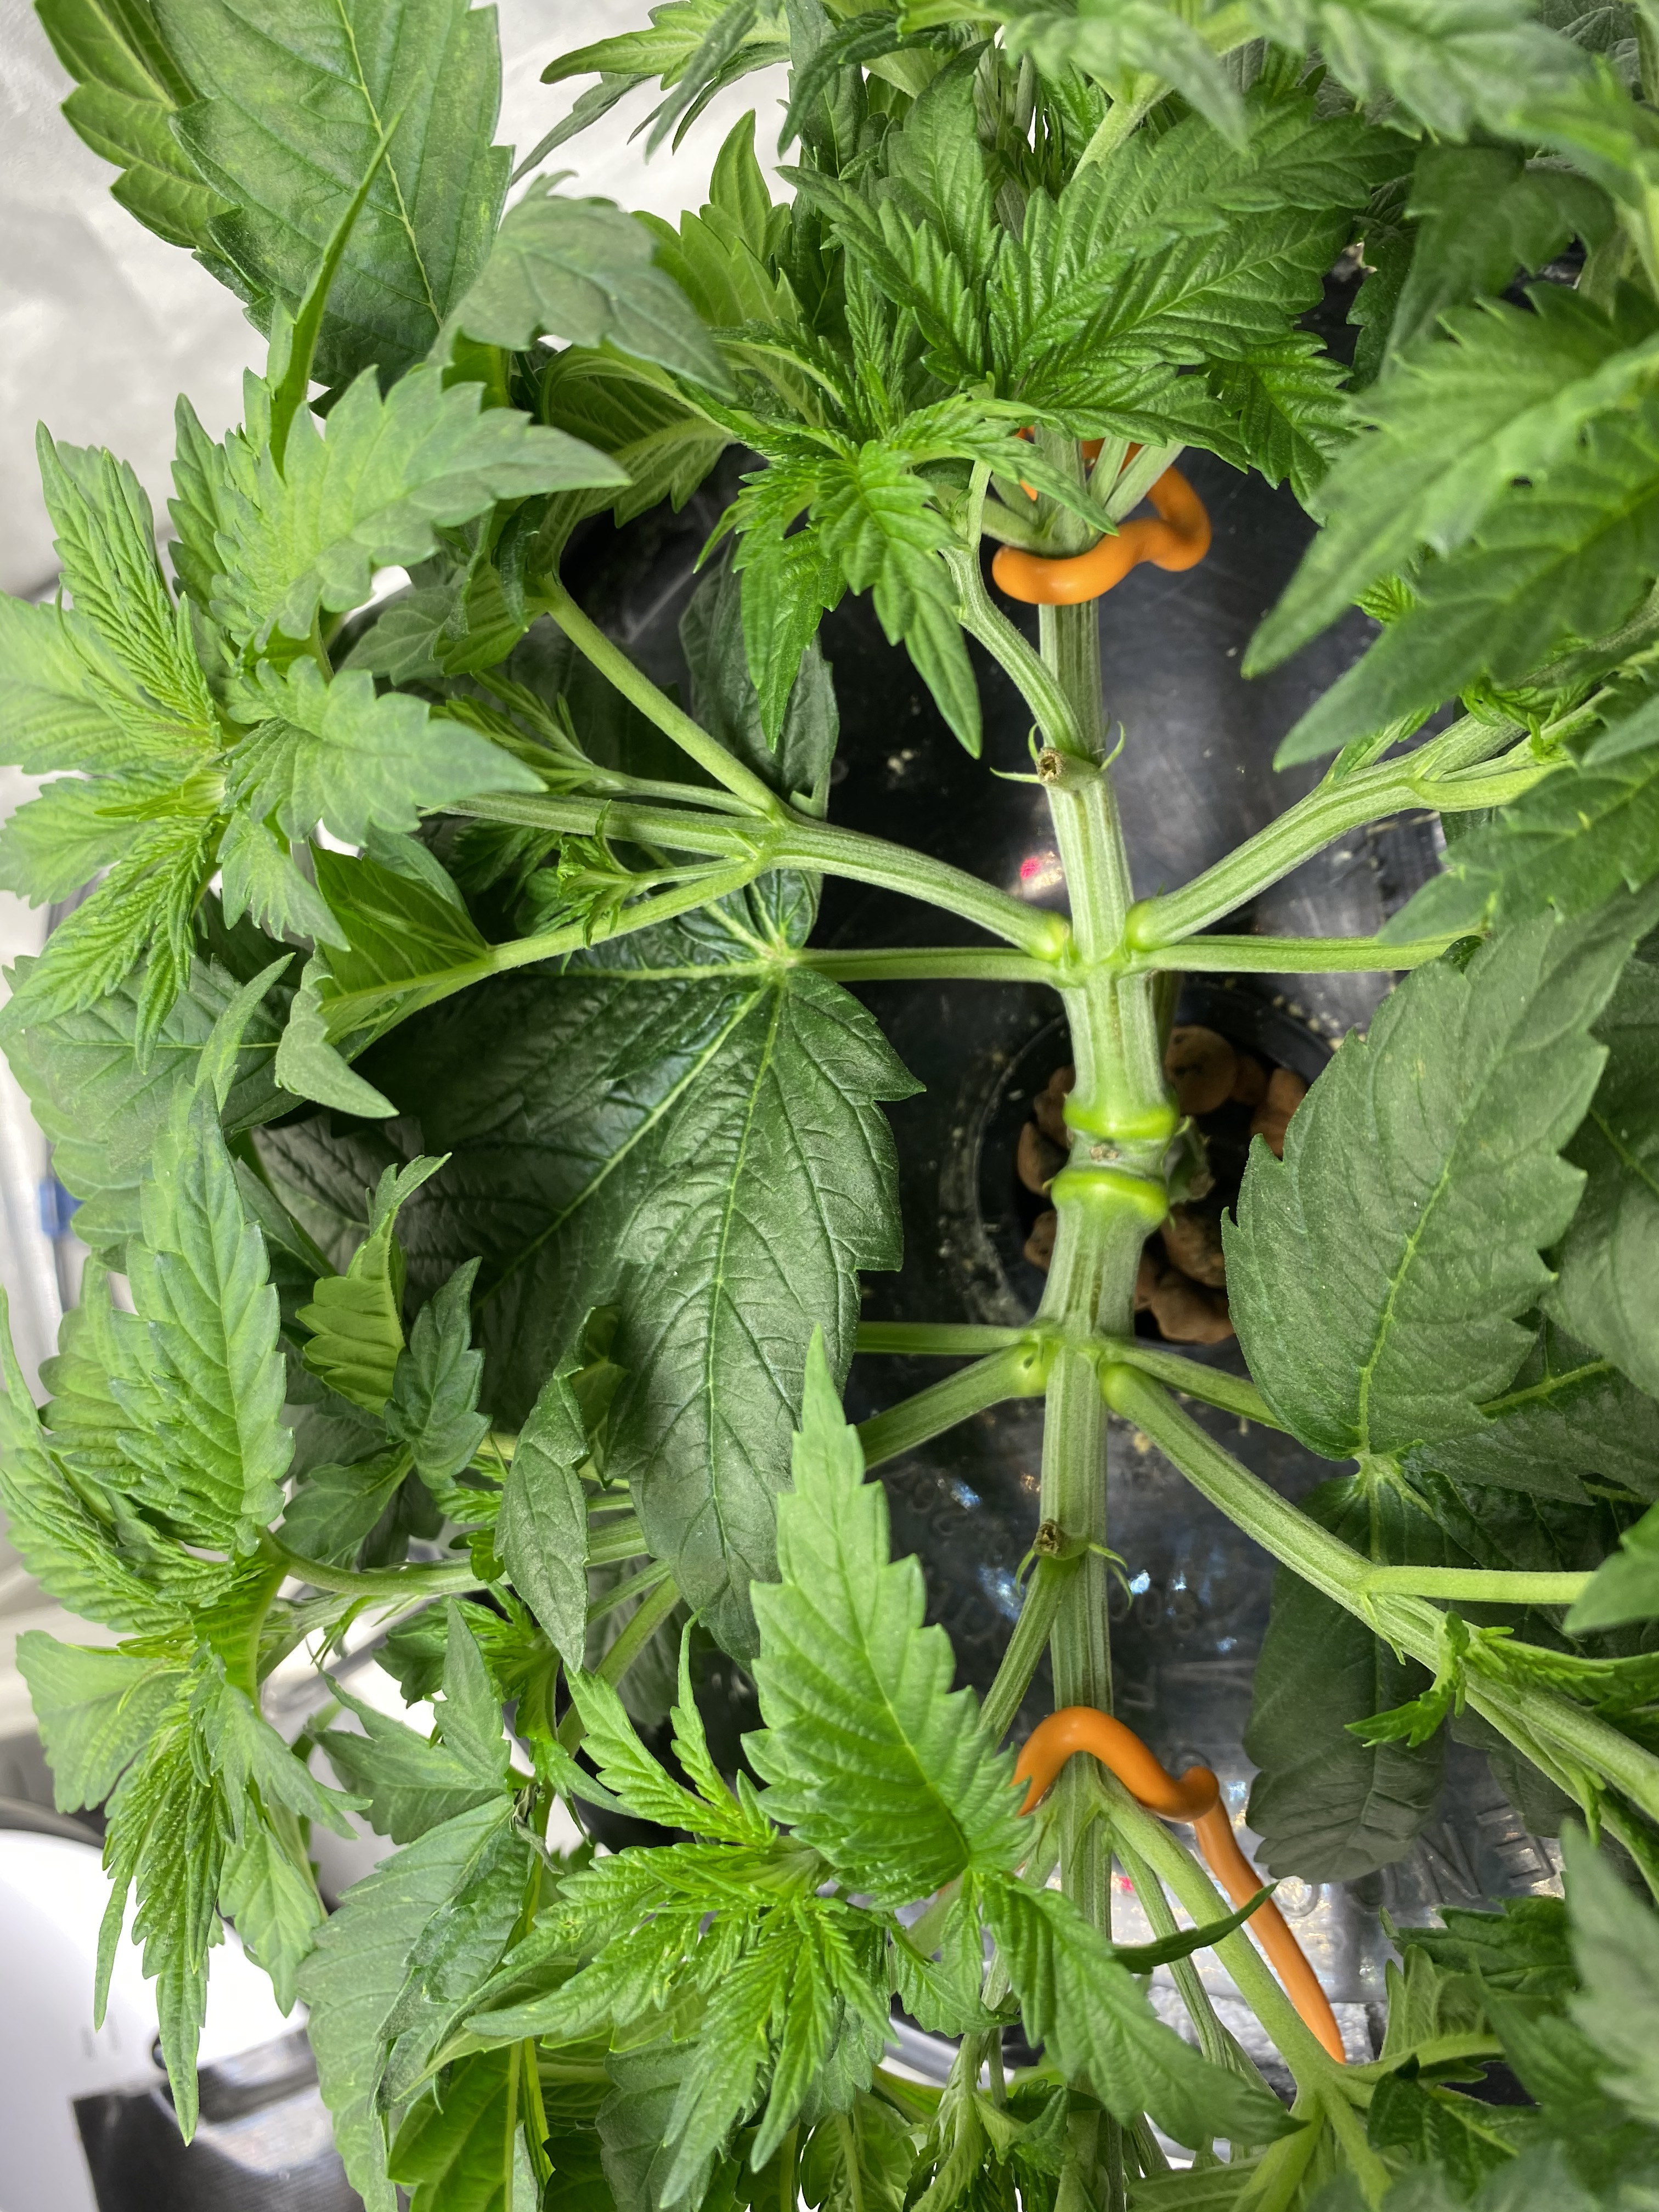
In the image above you can clearly see where the large fan leaf over the upward growing node has been removed.
As long as your plant is still healthy and doing well, continue in the same vein for around a week - Removing all nodes that grow downward, keeping your plant as horizontal as possible, and removing all large fan leaves from above all upward growing nodes.
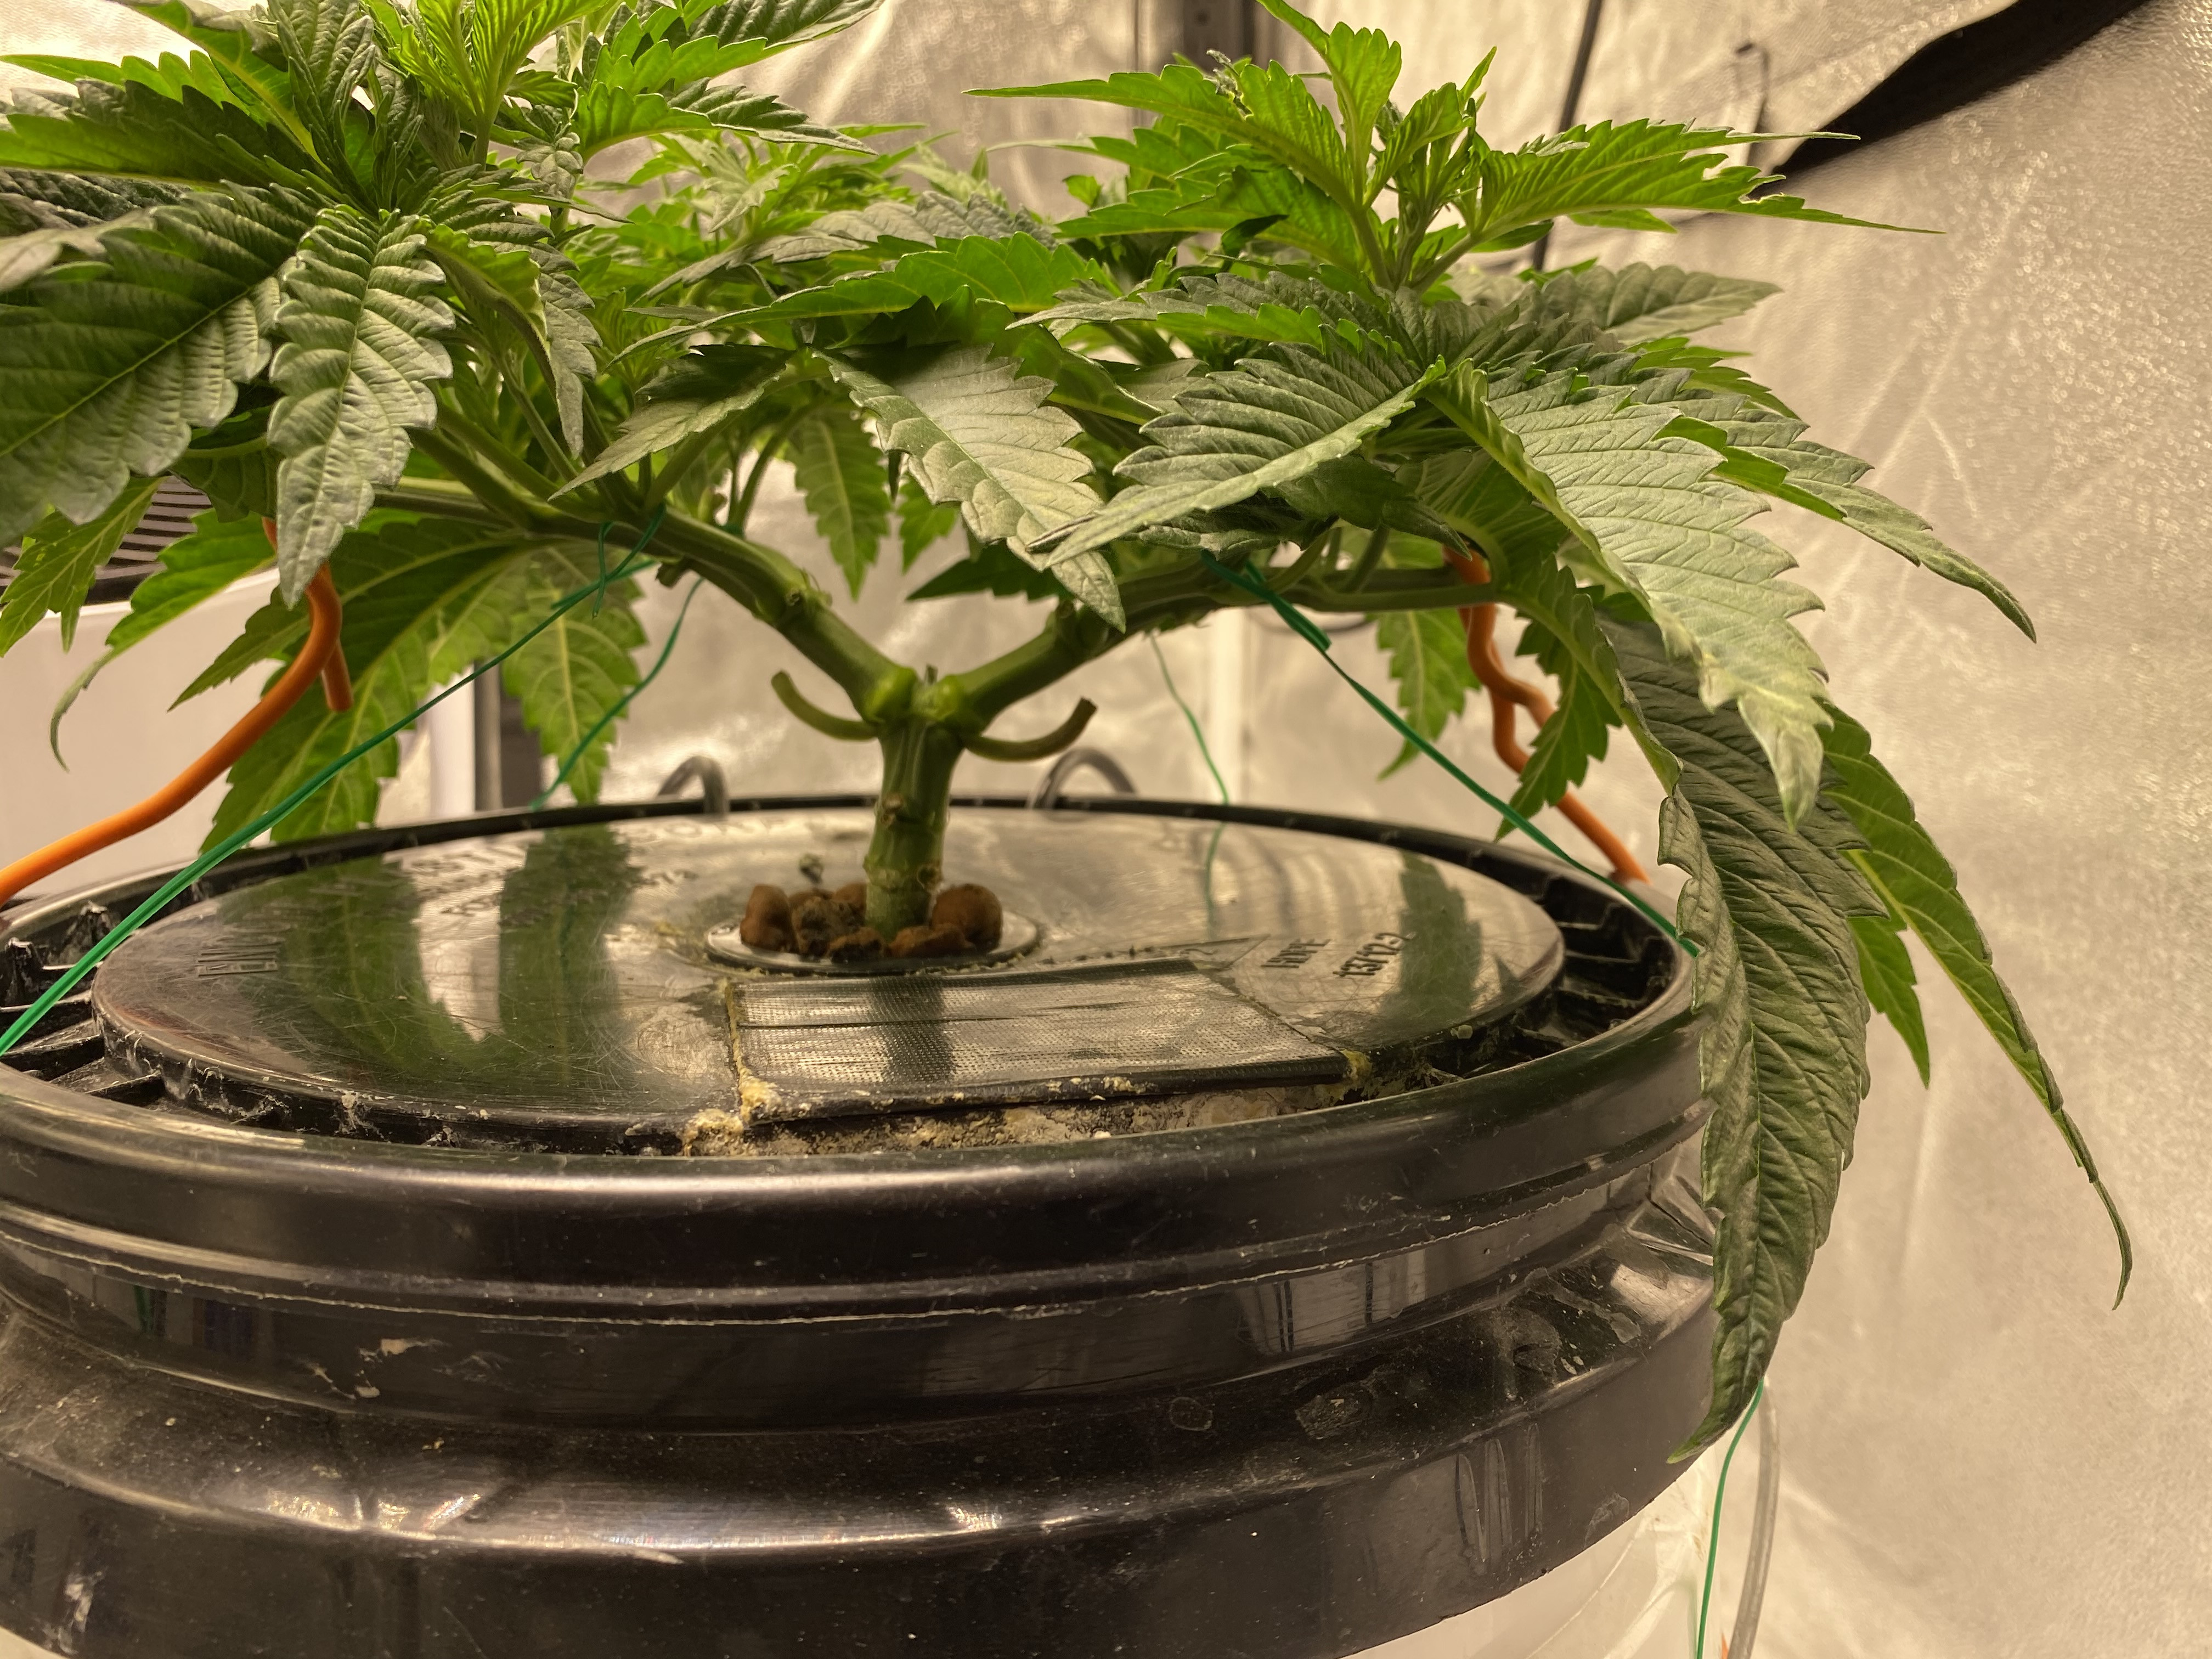
By the end of week 4 your plant should look very much like the one shown here.
When your plant has grown to the point that there are 3 branches growing on each side of the new branches we are going to 'top' the ends of each of them so that they look like this --<--<--<.
>-->-->--o--<--<--<
You should have 3 branches on each side of your two new branches growing horizontally and 3 branches growing upward on each side of the Y.
This will give you 18 flowering branches to start (or 16 should you remove the upward growth at the end of the branch). Whether you have 16 or 18 branches at this point is not too big of a deal as you are going to have an average of 40 when you are done.
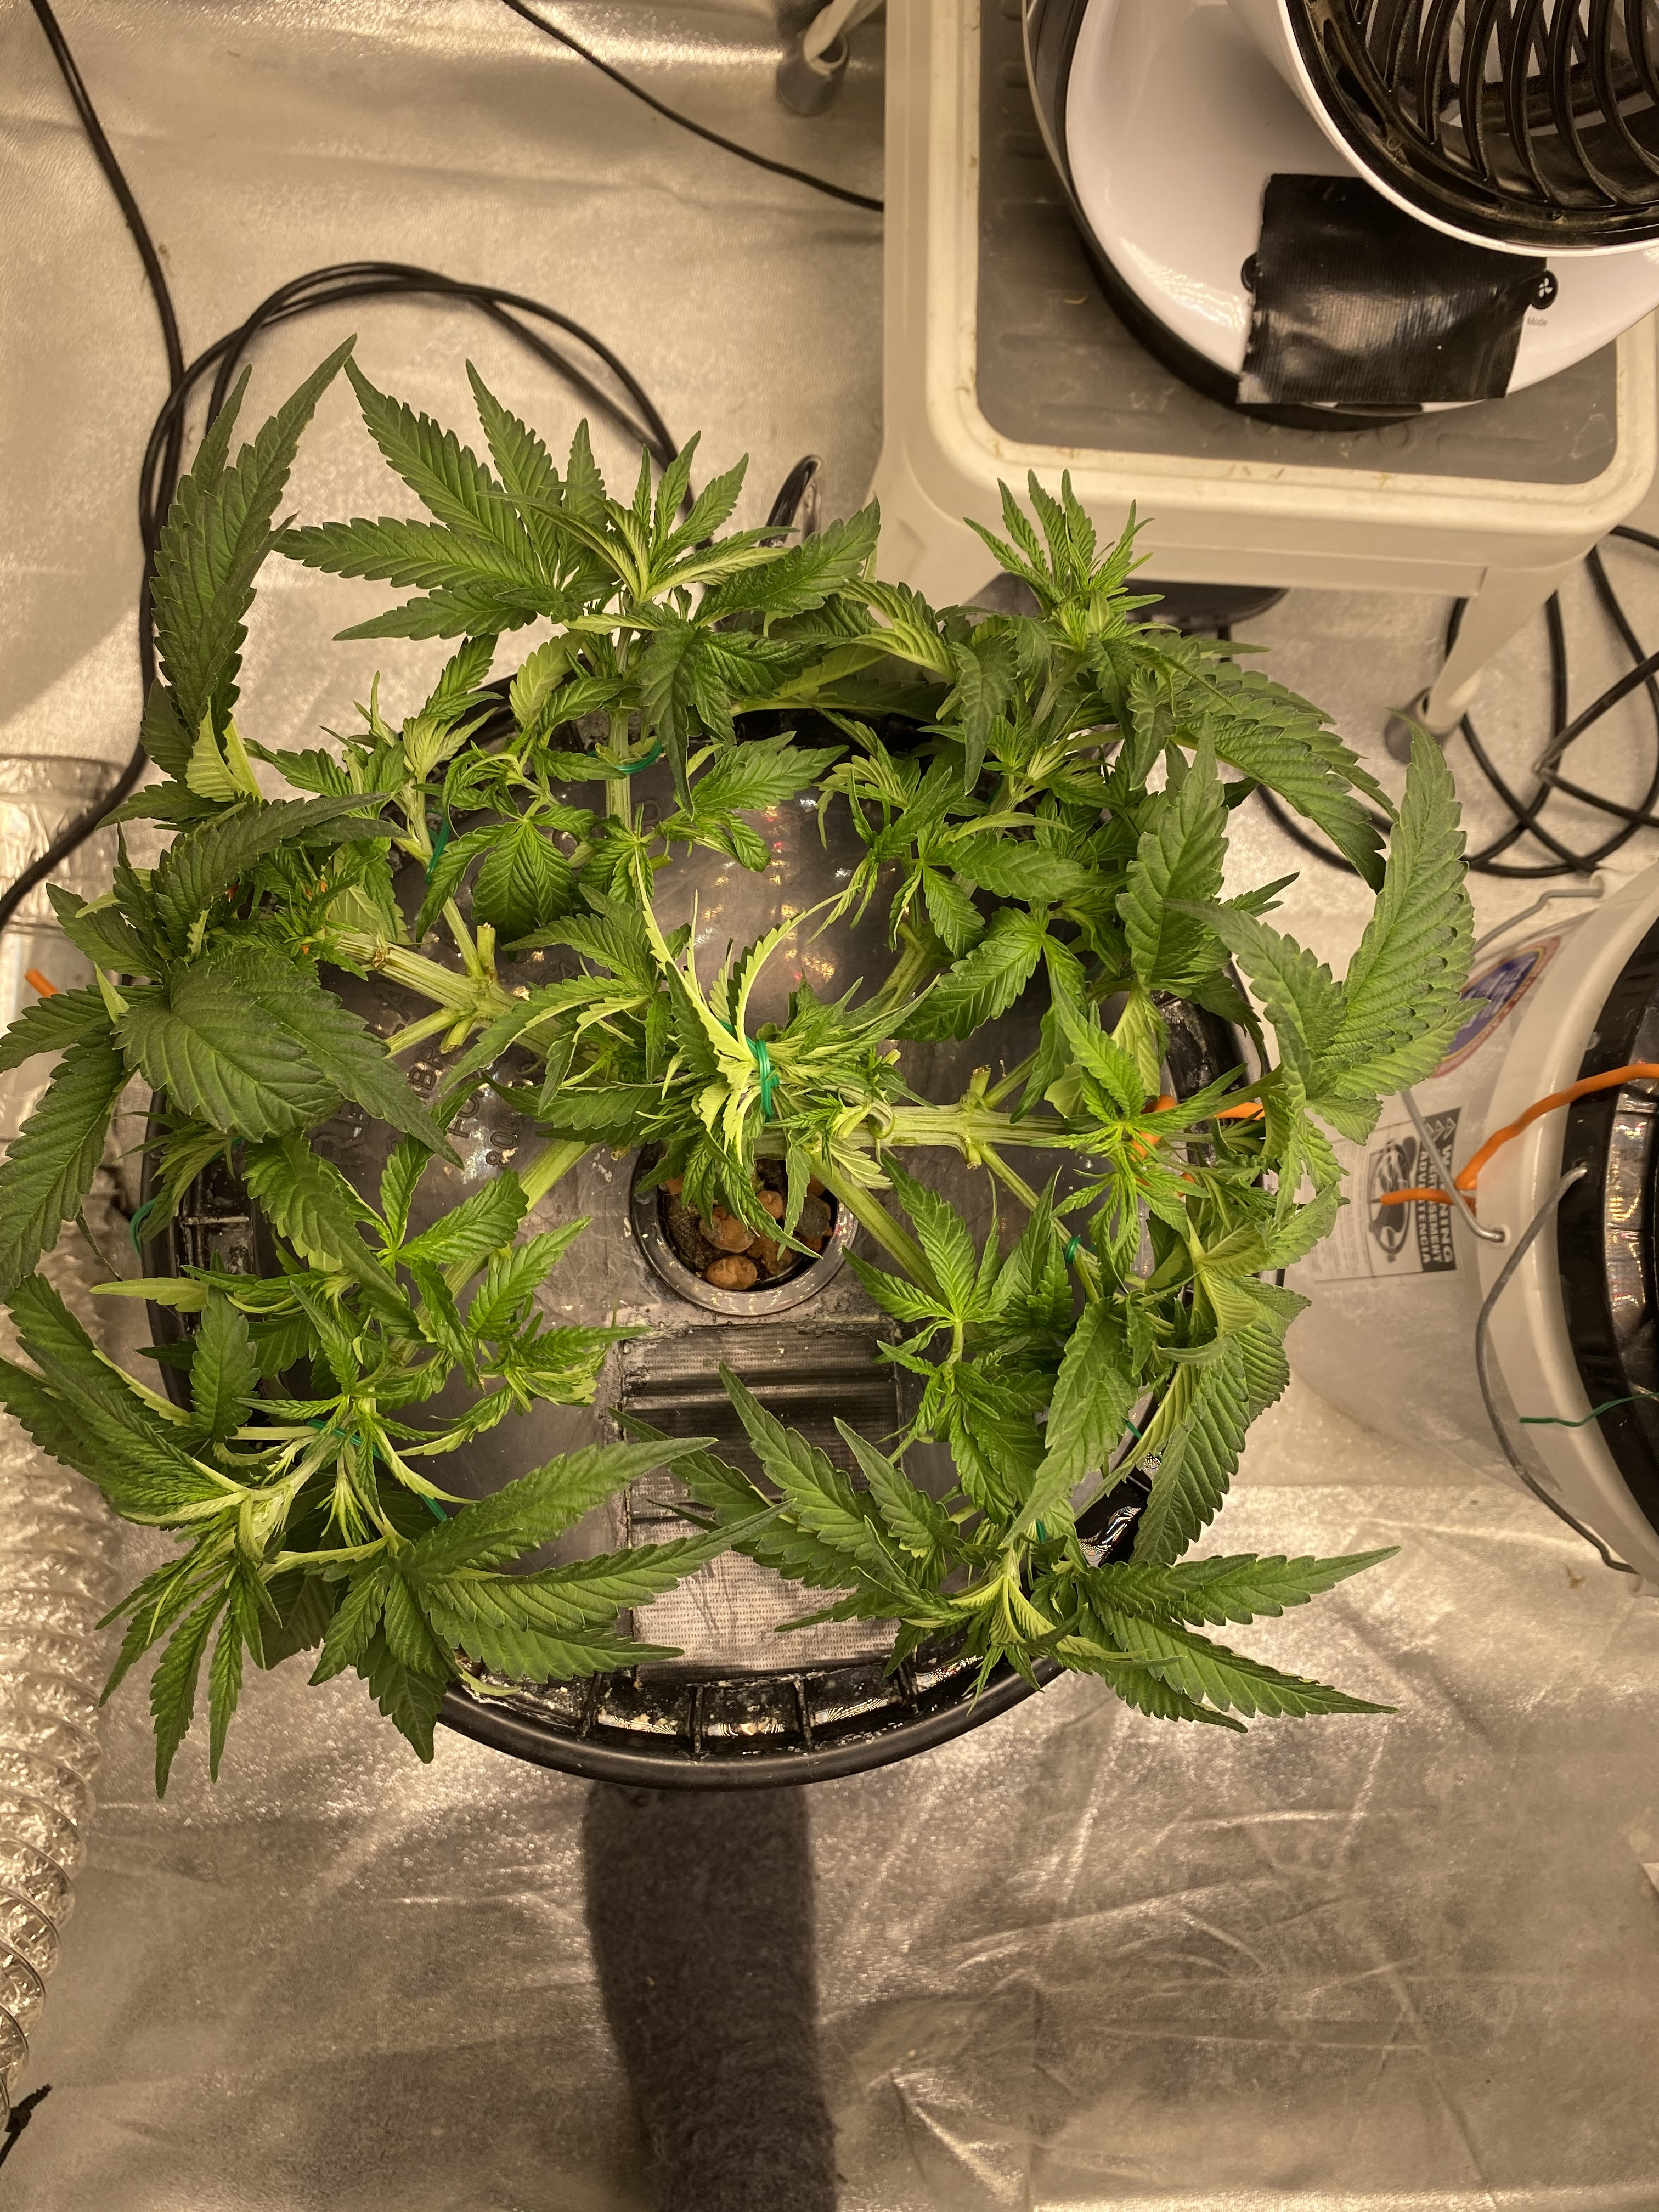
As your plant grows keep it as 'splayed out' as possible. The plant above has 3 branches on each side of the new branches and two growing upward. In order to make the most of space on your plant I usually fold each of the two first vertical branches together as shown above so that there is no 'donut hole' in the center of your plant as it grows. By week 5 your plant should be 95% done with any training and be ABOUT as big in circumference as your growing container and/or a 5 gallon bucket.
Let your plant grow as usual. Care for it as you would normally care for your babies, but DON'T removing any branches growing upward. Once your plant is about as big around as a 5 gallon bucket growth will be upward and outward.
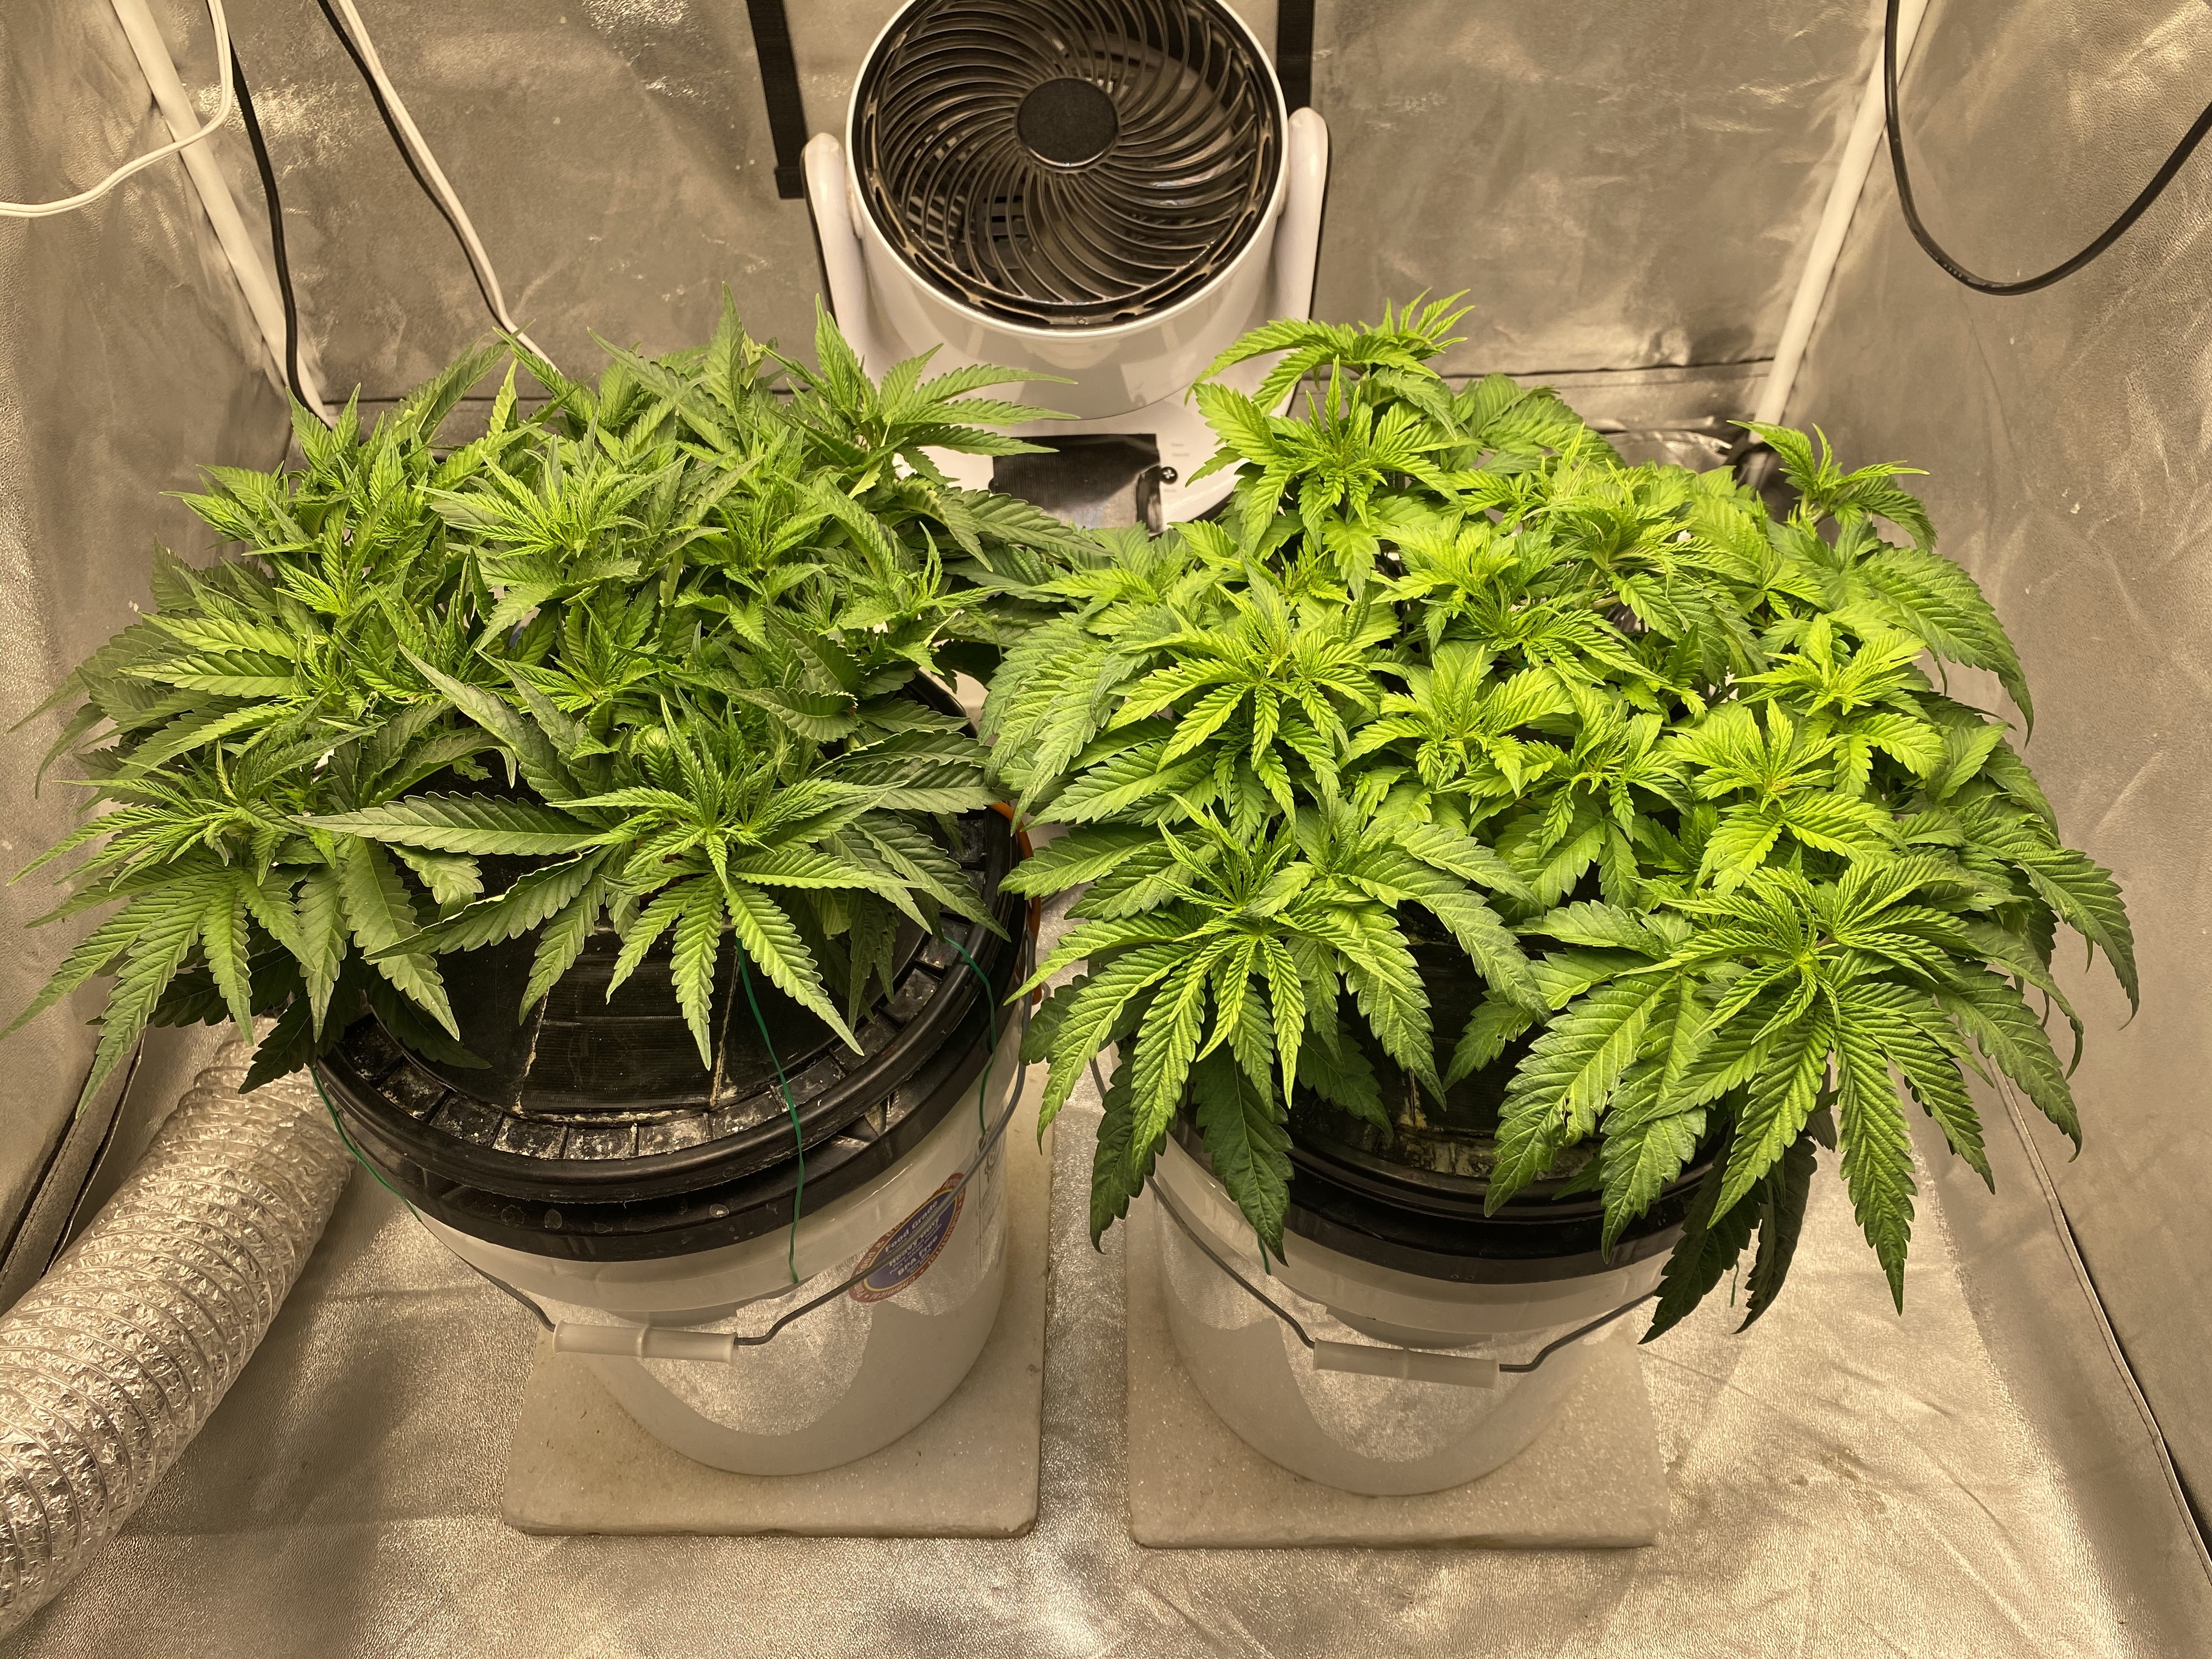
By mid week 6 your plants should look similar to these two girls.
I have a sneaking suspicion that I am going to be done with the HOW TO part of this journal long before my current grow finishes up (just starting week 4 today). Should that be the case, and I'm quite certain it will be, please feel free to ask questions and make comments - even if I don't have the answer; someone on GWE will know and I will do my best to insure that questions are answered. I am not afraid to say, "I don't know", if in fact, I don't - but someone will know. e.g., I love how Poppa and others have already proven my point.
Last time on "How I average a pound per plant" we had gotten our plants up to a healthy 4 weeks old, topped it once and removed all leaves/branches below the initial Y cut - in this session we're going to get our training and the 'work' 95% complete.
As your plant grows you want to 'gently' fold down and restrain your two new branches so they are growing as horizontal as possible. As your plant grows new node sets will grow out. It will produce leaf nodes in sets - two horizontal and then two vertical. You want to remove all of the nodes that are facing downward. For example if your branch is growing nodes will appear rather like a "+" sign if viewed from the top (when growing vertical) or straight on from the end of the branch (when growing horizontal).
Unlike a traditional manifold, you want to leave all of the nodes/branches/leaves on your plant EXCEPT for those that grow downward. If viewed from the end of the branch your stem should look like and inverted "T". By the end of or during week 4 your plant should look similar to the one shown above.
As your plant continues to grow you want to keep it as horizontal as possible without breaking or damaging your two new branches. Remove all growth on the underside of your two branches. As the plant develops you want to remove the large fan leaf that will be over the second node growing upward.
In the image above you can clearly see where the large fan leaf over the upward growing node has been removed.
As long as your plant is still healthy and doing well, continue in the same vein for around a week - Removing all nodes that grow downward, keeping your plant as horizontal as possible, and removing all large fan leaves from above all upward growing nodes.
By the end of week 4 your plant should look very much like the one shown here.
When your plant has grown to the point that there are 3 branches growing on each side of the new branches we are going to 'top' the ends of each of them so that they look like this --<--<--<.
>-->-->--o--<--<--<
You should have 3 branches on each side of your two new branches growing horizontally and 3 branches growing upward on each side of the Y.
This will give you 18 flowering branches to start (or 16 should you remove the upward growth at the end of the branch). Whether you have 16 or 18 branches at this point is not too big of a deal as you are going to have an average of 40 when you are done.
As your plant grows keep it as 'splayed out' as possible. The plant above has 3 branches on each side of the new branches and two growing upward. In order to make the most of space on your plant I usually fold each of the two first vertical branches together as shown above so that there is no 'donut hole' in the center of your plant as it grows. By week 5 your plant should be 95% done with any training and be ABOUT as big in circumference as your growing container and/or a 5 gallon bucket.
Let your plant grow as usual. Care for it as you would normally care for your babies, but DON'T removing any branches growing upward. Once your plant is about as big around as a 5 gallon bucket growth will be upward and outward.
By mid week 6 your plants should look similar to these two girls.

ChadWestport
New member
You do a great job.
Thanks ChadWestport I don't do many things well, but cannabis and I seem to have an understanding. Who knows why, but it works for me.