What's new
GrowWeedEasy.com
You're browsing as a guest. Sign up to join the conversation, share your grows, and get help from thousands of fellow growers — it's free and takes less than a minute.

Newbie McGyverisms

aintdedyet

New member
Necessity … the mother of invention … a sentiment that appears to be alive and well here in the GWE community …

Thought I'd share a few mickey mouse ideas I've come up with during this my 1st grow. Old hat to some I suspect, but if it helps just one fellow grower then my payback to the forum has begun.

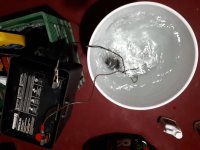
1. Nute mixing tank: 5 gallon pail, 12V power supply, and an 800-1200 gph submersible pump: easier to prep a homogeneous nute mix and measure pH.

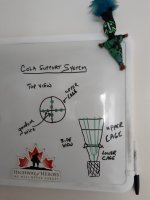
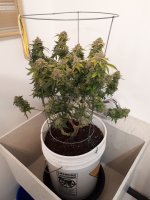
2. 2-stage cola support structure: use a smaller tomato cage to start out. When needed, add a cut down portion of a larger ring to the top of the smaller one. Use garden wire to tie the two cages together and form a mini-scrog for cola support. Using only the smaller cage to start frees up more space.

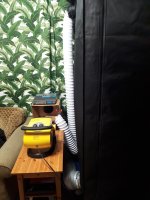
3. Heat/R.H. control: a challenge for most, especially or us ol' scrooges here in the Great White North who don't want to pay too much for electricity. I feed the output of a small space heater into a "collector box" and then through a 6" line into the bottom of my tent. The distance between the heater and box allows me to control the temp. in the tent. Air is removed tom the top using a 6" fan with carbon scrubber. I reduced the output line from 6" to 4" and feed this back into the collector box when I'm using the exhaust fan, for heat recovery. The setup appears to be giving me good temp and R.H.control … not sure if it's saving me any money.

RSVP with any comments, questions, or concerns. Thanks all!

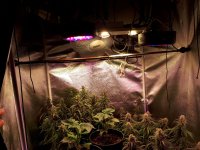
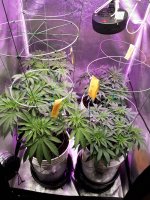
Current grow (day 9 of flower after 57 day veg.)

soil mix
Jack 1 (8-cola manifold)
Jack 3 (LST after 1 topping)
Afghan (8-cola manifold)
Passion (R.I.P.; 16 cola manifold on a male!)
LEDs throughout
AN MGB
 

Attachments

  • photo68137.jpg
    photo68137.jpg
    3.9 MB · Views: 0
  • photo68621.jpg
    photo68621.jpg
    2.4 MB · Views: 0
  • photo68622.jpg
    photo68622.jpg
    2.5 MB · Views: 0
  • photo68623.jpg
    photo68623.jpg
    2.9 MB · Views: 0
ADY, what pump are you using? I'm thinking of getting a more powerful pump for my reservoir? All that water movement on the surface is just what I'm lookiing for.
 
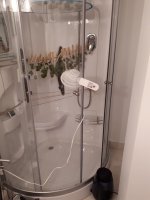
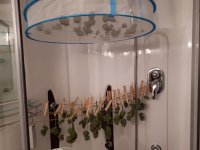
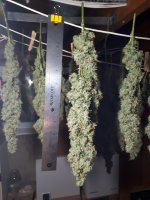
laundry tub as flush station, shower stall as drying chamber … these ladies are getting some high-class treatment … lame pun intended!:silly:
 

Attachments

  • photo74924.jpg
    photo74924.jpg
    2.5 MB · Views: 0
  • photo74925.jpg
    photo74925.jpg
    2.2 MB · Views: 0
  • photo74926.jpg
    photo74926.jpg
    2.2 MB · Views: 0
Thanks Colombo … still got a bit of a stank on tho', but a good kinda stank!
yup … gentle breeze with clip fan to keep them moving just a bit … targeting 7-10 days
 
Greetings fellow growers, and apologies for being away for a while … been doin the battle with bladder cancer … but aintdedyet! (hurray!)

Here's a couple more McGyverisms:

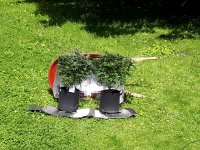
Girls needed a windbreak when they're outdoors. Flipped a wheel barrow on its side, lined it with a car sunvisor, et voila, an effective wind screen, slightly increased stealth factor, and as a bonus, a pseudo sort of parabolic reflector dish to direct those glorious (and free) photons into the underparts of the girls. Don't know if it helps, but it can't hurt.

Getting crowded in the tent. Used a curtain rod as a spreader bar to gain an extra 6" on each side. So far no ill effects on the structural integrity of the tent, and the girls are loving the extra elbow room. Be sure to lock in the desired width with a set screw or something … duct tape tends to soften and let go, and you'd hate to see the rod crash down on a lady (voice of experience there!)

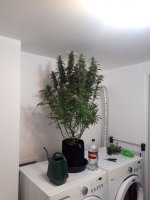
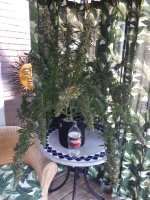
Will bring y'all up to speed on what I been up to in a more detailed post later on. For now a couple of pics … the one is a Super Silver Haze photo vegging outside, the other a Northern Lights/Blue auto that's done very well and is I think a couple of weeks from harvest. I don't really want to punch a hole in the ceiling!

Enjoy and good growing!

p.s. please do not ignore unexplained weight loss (again, the voice of experience) …
 

Attachments

  • photo80276.jpg
    photo80276.jpg
    1.1 MB · Views: 0
  • photo80277.jpg
    photo80277.jpg
    1.1 MB · Views: 1
  • photo80278.jpg
    photo80278.jpg
    1.1 MB · Views: 0
  • photo80279.jpg
    photo80279.jpg
    456.4 KB · Views: 0
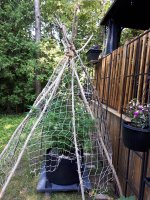
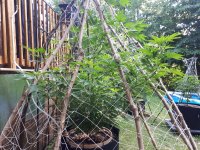
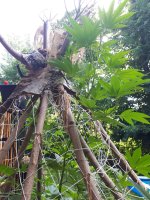
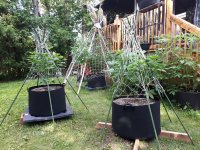
Put this together in an afternoon for less than $5. Went with 3.5" mesh. I'm thinking I can add more poles and a second mesh layer if need be, and if we get a bad rain I can jam a golf umbrella in the top or something to help control moisture levels
That's a Super Silver Haze photoperiod in a 30 gallon fabric pot, currently 85 days into veg and 4' tall. Letting her go completely au naturale, with no topping, LST, defoliation, etc. Hoping for 150-200% stretch and maybe 12-15' when she's done, with colas 3.49" max diameter :p … we'll see how that goes …
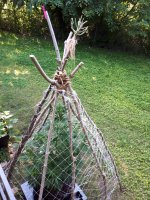
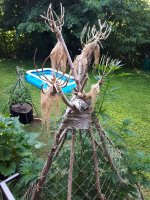
Using carcasses from current harvest to decorate in a Rasta/voodoo motif; hopefully help scare the critters away. Those ultrasonic emitters don't seem to help much.
Working on a drip type irrigation system with which to water/feed from above, instead of having to crawl into the teepee. Will post pics of that if it works out.
 

Attachments

  • photo80866.jpg
    photo80866.jpg
    1.4 MB · Views: 0
  • photo80867.jpg
    photo80867.jpg
    1.4 MB · Views: 0
Thanks y'all for kudos and best wishes … definitely feeling better these days … maybe it's because harvest time approaches :D Good thing too … don't care what you put in 'em, those 30 gal. fabric pots get heavy!
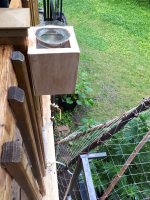
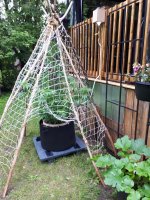
So I completed an irrigation system using some tubing, plumbing bits, and some scrap wood I had lying around. The reservoir consists of a 2L pop (soda) bottles nestled in a purpose-built box. I'm in the process of adding a 2nd pop (soda) bottle to double capacity and halve refill frequency.
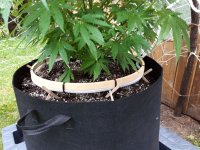
The ball valve affords great control over the delivery rate. For the drip ring I convinced the better half to "donate" one of those wooden split rings used for sewing. Zip tied the tubing to the ring and drilled a series of 8 pairs of holes evenly around the circumference. Opened up the ring to position it around the stalk (trunk?) Keeping the ring about 1" above the soil using X supports made from popsicle sticks, the idea being to keep the holes clear. (over 60 years old and still gluing together popsicle sticks!)

I didn't have a choice as to the circumference of the drip ring, but I think I lucked out in terms of its position within the pot. Got me thinking what would be the optimum position. On the one hand people talk about plants having a natural drip line around the base of canopy. On the other, with fabric pots I don't want to be watering too close to the outer edge and have it flowing over the media.

Total cost was $3 …. yard sale price I gave the better half for the wooden ring. I figure we both got a good deal, and it's sure gonna simplify the whole water/feed/flush process.

Accompanying Silver on this my 1st outdoor grow adventure will be a pair of feminized Blue Dream photoperiods. These are currently 35 days from seed, and have been topped once followed by LST. They're destined for 30 gal. fabric pots as well, and I'm thinking of replicating the teepee/Scrog idea. I'm currently mapping out sun distribution patterns to determine where best to locate them once they're ready for final transplant.

alltatup: close-up of voodoo carcass #1included … can't wait until the teepee if fully decorated (meaning current harvest season has ended :)

RSVP with comments, questions, or concerns, and thanks for taking a look at my posts.
 

Attachments

  • photo80976.jpg
    photo80976.jpg
    1.2 MB · Views: 0
  • photo80977.jpg
    photo80977.jpg
    1.2 MB · Views: 0
  • photo80978.jpg
    photo80978.jpg
    881.9 KB · Views: 0
  • photo80979.jpg
    photo80979.jpg
    1.3 MB · Views: 0
  • photo80980.jpg
    photo80980.jpg
    980.4 KB · Views: 0
AWESOME WORK, ADY!!! It's breathtaking, the work of true genius!!

I love the carcass: I have them around my house, guarding Buddhist statues and whatnot.
 
Last night I was cleaning the dab crucible on my Pax 3 and accidentally dropped a little metal screen thingie that goes inside it down into my garbage disposal.

I had just finished making some gummi bears and had a little resin still on my silmat, so I stuck it on the end of my finger, stuck my finger down in the disposal, and picked up the little metal screen with the tip of my finger. :D
 
Bogleg You clever, resourceful, waste-not-want-not pot-vaping human!!!

I just got a Pax 3 a few weeks ago (waiting for my fking Ghost MV1 to get fixed); I really like it a lot.
 
hey y'all, hope all is well in your world.


In the middle of my 2nd indoor grow harvest and came up with these:
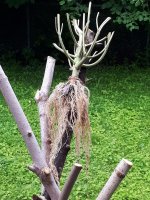
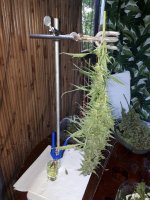
1. retort stand & 3-finger clamp to minimize bud handling during wet trim
2. I use 2 pairs of precision shears, 1 in active use, the other soaking in a suitable solvent (isopropanol, absolute ethanol, etc.). Every so often I swap them out. After soaking the blades clean up easily with one or two wipes on a paper towel. Got me thinking I might switch to the hi-test alcool you can buy at the liquor store and see what I can do with the soaking solution … turns a nice shade of green during use, and evaporates off to a gooey brown resin … hmmmmm?

The grow consisted of 4 feminized Northern Lights/Blueberry auto flowers that I planted on April Fool's Day. Had a couple of hiccups along the way, but I'm super stoked by the results. I'll let you know the final 4-plant tally, but the best single-plant yield will be 113 g (4 oz), weighed just before going into the jars after 8 days of drying at 55% RH and 65-70F. There's a pic of the beast just before chop with a 2L pop (soda) bottle, and one of the nine 10-12" colas she produced. After only a few days in the jar the smoke's still a wee bit harsh, but it definitely has a lovely berry taste and she does the trick.

My 1st outdoor grow continues well. Silver loves her new home and is now just over 6 feet tall. Hard to measure exactly because she behaved herself and went to a hole I cut in the netting at the top, and so she's got a bit of a bend in her. Recent enhancements include the addition of a 2nd pop (soda) bottle to the reservoir of the drip irrigation system, the addition of a 6" protective band of birch bark around the top to help deflect rainwater away from the 30 gallon pot beneath (a wee bit better moisture control?), and a lovely name tag fashioned from the same bark. Decorating is now complete with the addition of the carcasses from the 2nd harvest. Nice bleaching pattern as the carcasses age. I also relocated my RH/Temp. sensor from the tent to the teepee. Not that I can do anything about it, but nice to monitor.

The plan was to let Silver grow au natural, but the netting makes it so easy to LST that I couldn't resist. Every day or two I just pull the stems down a square or two. Aiming for laying out the branches as flat as possible before letting them head for the sky … good penetration, air circulation, etc. Should be interesting to see what final shape she assumes.

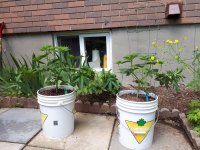
The two Dream girls have now joined Silver in 30 gal. fabric pots in their final positions outdoors. Used a meter to map out the best place to put them, together with stealth and smell considerations. The better half bought me some stakes so I went with them instead of natural poles, but the idea is the same. The ladies were topped once and taken through some pretty intense LST (you might be able to see a couple of "band-aids" in the photo), so I'm hoping they'll be a little shorter than Silver but just as productive. We'll see.

Enjoy the pics. Thanks for taking a look, and good luck to y'all in your efforts!

aintdedyet
 

Attachments

  • photo82012.jpg
    photo82012.jpg
    1.1 MB · Views: 0
  • photo82013.jpg
    photo82013.jpg
    930.5 KB · Views: 0
  • photo82014.jpg
    photo82014.jpg
    619.7 KB · Views: 1
  • photo82015.jpg
    photo82015.jpg
    1.4 MB · Views: 0
  • photo82016.jpg
    photo82016.jpg
    1.4 MB · Views: 0
  • photo82017.jpg
    photo82017.jpg
    1.3 MB · Views: 0
  • photo82018.jpg
    photo82018.jpg
    1.7 MB · Views: 0
Really cool ideas ady, and super nice BUDS !!! Hope things are well and getting better ! Good Growing !!
 
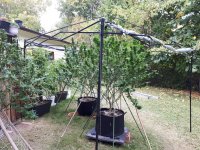
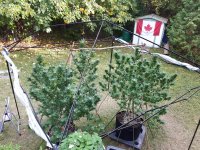
I'm thinking at least 3 weeks until these Blue Dream are ready to chop. Getting worried about the possibility of frost here in southeastern Ontario. My little brother had an old gazebo frame that I've re-purposed into a frost shield that I can deploy easily if/when needed.

A fellow grower told me that it's good to wait until after the first frost to harvest ... higher potency, better taste, etc. Not sure if there is any truth to it. Nor did he tell me whether the plants should actually be touched by the frost, or just experience frost temperatures. Any input on this greatly appreciated. Thanks all ... wishing you bountiful harvests!
 

Attachments

  • photo87327.jpg
    photo87327.jpg
    1.7 MB · Views: 0
  • photo87328.jpg
    photo87328.jpg
    1.8 MB · Views: 0
Back
Top