
GrowWeedEasy.com
You are using an out of date browser. It may not display this or other websites correctly.
You should upgrade or use an alternative browser.
You should upgrade or use an alternative browser.
Growing and going full tilt No Till
- Thread starter Paracelsus
- Start date


Paracelsus
New member
Well actually what you’re doing is very close to what I’m doing it’s just your soil recepie is taken from a basic level of goodness with the same combination as my basic recipe. Then yours is preloaded with all the minerals and amendment for the whole growth cycle. In fact the original recipe as written in the language of the author is referred to as a Kind soiI more than one time, not meant as a brand but as a philosophy. What you have With the marketing label of Kind soil Is a very close relative of No Till Gardening. Really marketing genius having the make believe Mr. kind
Last edited:
Paracelsus
New member
[TABLE="cellpadding: 4"]
[TR]
[TD]Deutsch: Hanfpflanze. A blühende männliche und B fruchtende weibliche Pflanze in natürl. Grösse; 1 männliche Blüthe, vergrössert; 2 und 3 Staubbeutel von verschiedenen Seiten, desgl.; 4 Pollenkorn, desgl.; 5 weibliche Blüthe mit Schutzblatt, desgl.; 6 dieselbe ohne Schutzblatt, desgl.; 7 Fruchtknoten im Längsschnitt, desgl.; 8 Frucht mit Schutzblatt, desgl.; 9 dieselbe ohne Schutzblatt, desgl.; 10 Same, desgl.; 11 derselbe im Querschnitt, desgl.; 12 derselbe im Längsschnitt, desgl.; 13 Same ohne Samenschale, desgl.
English: Hemp plant. A flowering male and B seed-bearing female plant, actual size; 1 male flower, enlarged detail; 2 and 3 pollen sac of same from various angles; 4 pollen grain of same; 5 female flower with cover petal; 6 female flower, cover petal removed; 7 female fruit cluster, longitudinal section; 8 fruit with cover petal; 9 same without cover petal; 10 same; 11 same in cross-section; 12 same in longitudinal section; 13 seed without hull.
Latina: Cannabis sativa.
[TABLE="cellpadding: 4"]
[TR]
[TD] [TABLE="cellpadding: 2, cellspacing: 0"]
[TR]
Walther Otto Müller (1833–1887)

 [/TR]
[/TR]
[TR]
[TD]Alternative names[/TD]
[TD="colspan: 2"]W.O.Müll.; W. O. Müller[/TD]
[/TR]
[TR]
[TD]Description[/TD]
[TD="colspan: 2"]German botanist[/TD]
[/TR]
[TR]
[TD]Date of birth/death[/TD]
[TD]20 June 1833[/TD]
[TD]17 July 1887[/TD]
[/TR]
[/TABLE]
[/TD]
[/TR]
[/TABLE]
[/TD]
[/TR]
[/TABLE]

[TR]
[TD]Deutsch: Hanfpflanze. A blühende männliche und B fruchtende weibliche Pflanze in natürl. Grösse; 1 männliche Blüthe, vergrössert; 2 und 3 Staubbeutel von verschiedenen Seiten, desgl.; 4 Pollenkorn, desgl.; 5 weibliche Blüthe mit Schutzblatt, desgl.; 6 dieselbe ohne Schutzblatt, desgl.; 7 Fruchtknoten im Längsschnitt, desgl.; 8 Frucht mit Schutzblatt, desgl.; 9 dieselbe ohne Schutzblatt, desgl.; 10 Same, desgl.; 11 derselbe im Querschnitt, desgl.; 12 derselbe im Längsschnitt, desgl.; 13 Same ohne Samenschale, desgl.
English: Hemp plant. A flowering male and B seed-bearing female plant, actual size; 1 male flower, enlarged detail; 2 and 3 pollen sac of same from various angles; 4 pollen grain of same; 5 female flower with cover petal; 6 female flower, cover petal removed; 7 female fruit cluster, longitudinal section; 8 fruit with cover petal; 9 same without cover petal; 10 same; 11 same in cross-section; 12 same in longitudinal section; 13 seed without hull.
Latina: Cannabis sativa.
[TABLE="cellpadding: 4"]
[TR]
[TD] [TABLE="cellpadding: 2, cellspacing: 0"]
[TR]
Walther Otto Müller (1833–1887)
[TR]
[TD]Alternative names[/TD]
[TD="colspan: 2"]W.O.Müll.; W. O. Müller[/TD]
[/TR]
[TR]
[TD]Description[/TD]
[TD="colspan: 2"]German botanist[/TD]
[/TR]
[TR]
[TD]Date of birth/death[/TD]
[TD]20 June 1833[/TD]
[TD]17 July 1887[/TD]
[/TR]
[/TABLE]
[/TD]
[/TR]
[/TABLE]
[/TD]
[/TR]
[/TABLE]
Last edited:
Paracelsus
New member
That is a big challenge oldjarhead100 I admire how you make your rounds with the scoop of this and a scoop of that. Have you got a pooper scooper?
Paracelsus
New member
Check all three sites up from the ridiculous to the sublime
http://www.microbeorganics.com/#So_Y...ost_Tea_Brewer
https://buildasoil.com/blogs/news/15...structions-diy
https://youtu.be/pKj7LV3hgrQ
[SIZE=-1][SIZE=+2]So You Wanna Build A Compost Tea Brewer[/SIZE]
Terms:
* = degree(s); CT = compost tea; ACT = aerated compost tea; O2 = oxygen; CO2 = carbon dioxide
DO2 = dissolved oxygen; CFM = cubic feet per minute; PPM = parts per million
There are several ways to make your own compost tea brewer which may not produce the equivalent results to some commercially available models but should provide you with a microbial extract you can apply to your soil and plants. When I first started messing around with brewers, I experimented with what we had lying in our various junk heaps around the farm; cast-offs from buying the wrong part at the plumbing store, outdated irrigation systems, left over pipe, dead vehicles and other modern broken things. Therefore, if you are a junk collector like me, you may already have much of what you require to build a compost tea brewer.
First of all I’d like to make it clear that most aquarium air pumps don’t produce enough air to use in a container larger than 1 gallon when considering making an aerated brewer. So don’t even try the 5 gallon pail with the aquarium pump idea everybody is passing around. You need a minimum 0.05 CFM (cubic feet per minute), open flow of air and an optimum 0.08 CFM per gallon (US) or higher to make aerated compost tea (ACT). ACT should have the DO2 sustained at or above 6 PPM. Generally, aquarium pumps produce around 0.02 to 0.16 CFM. Another generality is that 25 watts of power usually produces 0.75 to 1.0 CFM in diaphragm air pumps. The wattage is usually marked on the pump which will help you figure out the approximate output. I’ll cover more on air pumps later.
In the following I will outline some simple methods of building a variety of compost tea makers. I am not going to discuss anaerobic methods at this time. Later on I may add some sketches.
1/ [SIZE=+1]Stir Method:[/SIZE] The cheapest way to make compost tea is the old fashioned way. Just add compost to clean, non-chlorinated, water (above 65 degrees F. recommended) and stir like mad with a clean stick or whathaveyou. I’d recommend using about 3 to 5% compost by volume of water and stir it up as often as you can over an 8 to 12 hour period. Some people do it over a 24 hour period and also add some foodstock like molasses, fish hydrolysate and kelp. You can experiment with different times and ingredients and decide for yourself. If you have a microscope, check it out. When you feel that you have a completed compost tea (CT) you can remove it in several ways. If you have just used a 5 gallon pail you can simply let the particulate matter settle and pour the clearer CT off into watering cans or your sprayer.
[SIZE=+1]Filtering;[/SIZE]
You can place a submersible pump into a mesh bag as a screen, drop it into the tank (barrel, pail) and pump the CT out. I use a regular cheap sump pump for this with a 800 to 1000 micron mesh bag (about the size of window screen) See the testing I did; [/SIZE]Does Microbial Life Survive Pump Impellers?[SIZE=-1] . You can purchase mesh bags at www.aquaticeco.com or make your own. Likewise, you can filter the CT by placing the same size screen over top of another pail and pour or siphon the CT through the mesh into the other vessel. If residue builds up, stop and clean off the mesh. As residue builds up it stops the passage of the microbes you want. Never run CT through a pipe constrained filter unless essential as part of your irrigation system or spray rig.
2/[SIZE=+1] The Venturi Method:[/SIZE] If you only have a water pump and wish to make a compost tea brewer you can inject air into the water by using a venturi. I have provided a sketch and text showing how to make your own or you can purchase them from http://www.aquaticeco.com . Basically the venturi creates a vacuum which interfaces with the water as it passes by, sucking air and mixing it with the water. It is quite an efficient method of oxygenating water. If you have a really tough water pump which does not clog, like a trash pump, you may run this type of brewer without a mesh extractor bag. Most are going to want to use a mesh extractor, so I recommend TEEing your water line downstream from the venturi with one return line suspended above the water and the other return line going into the mesh extractor. Undoubtedly you will require a valve to regulate the flow so all of the water does not just take the easiest route to the pipe suspended over the water. To build a CT brewer beyond the stir method, some basic knowledge of fitting plumbing parts and pipes together is essential, as well as some engineering instincts. If you are not up for this just save yourself the aggravation and buy a brewer. You may use your imagination for a mesh extractor. For a small brewer of 100 gallons or less, 400 microns is an ideal mesh size. Sometimes for large brewers which may run for several days to establish a functional nutrient cycling consortia a larger mesh size like 800 µm may be a better choice. This is because, as noted above, the mesh may clog up a little over time. A friend of mine successfully brewed CT using this method in a 5000 gallon brewer for many years. He used 2, barrel sized mesh extractor bags sewn from landscape cloth. He ran a return line into each bag, which was ¾ full of compost and tied off each bag tightly around the pipe so nothing could get out the top. These were dropped into the water (with his tractor) and 2 other return pipes pumped in oxygenated water. You can use your imagination to create mesh extractors, dependent on the size of your brewer, the materials at hand and what works for you. You can even create a basket which is partially above the surface to prevent particulate escape. These systems are not great for extracting and growing fungal hyphae but they produce bacteria/archaea and protozoa just fine.
[SIZE=+1]The Gas Exchange;[/SIZE]
The reason for suspending the other pipe(s) above the water is so it splashes into the water, breaking the water’s surface tension and additionally pushing more air into the water like a water fall or running river does. The surface tension of water is unique in its toughness; it surpasses that of oil. When I first started experimenting with the venturi method I had the return pipe submerged. The effects were profound. As the water filled with air, generated by the venturi, the water level rose, even over flowing my 1200 gallon tank. At the time, I thought this was a good sign that I was oxygenating the water. Sure, I was getting air in but was not getting the maximum dissolved oxygen possible with my system. Later when I learned that gas exchange means, ‘trading one gas for another’, I realized that the surface tension must be broken for the optimum gas exchange to occur. In this case, we are trading carbon dioxide (CO2) for oxygen (O2) or dissolved oxygen (DO2). CO2 must make way for DO2. In water, CO2 has two ways of being dissipated (of which I am aware). It is either used by organisms, like water plants or it must escape at the surface interface. In a brewer we have no plants and the microbes we are growing use O2 and create CO2, so the CO2 must escape at the surface. Because of the high surface tension of water, if we break the surface, this escape or release is facilitated and we improve the efficiency of our CT brewer. Once we started suspending the return pipe above the surface, providing a hardy splash to break the surface, we had no further over flows and the DO2 increased. NOTE: This principle applies to air driven brewers as well. The better the surface tension is broken, the better the capacity to contain DO2 in the water.
3/ [SIZE=+1]The Vortex Method: [/SIZE]There are many who claim that running water in a vortex pattern comprised of multiple mini vortices changes the properties of water beneficially. I remain dubious but open-minded. You can form your own opinion on this subject. One thing a vortex brewer is very good for is ensuring a full circulation of all the water and compost added. There can be no ‘dead zones’; none of the feared anaerobic pockets!! There is no point to considering the use of a mesh extractor with a vortex brewer unless you conceive of some genius method of suspending a mesh container in the center of the flow. Therefore this design is for those of you who don’t mind using compost in free suspension and deal with the particulate matter later. A vortex action in a CT brewer is pretty much dependent on the shape of the vessel used, combined with the direction of the input flow ‘nozzles’ or pipe ends and finally on the ability of the design to empty from a centrally located opening at the bottom of the vessel and the return of the water emptied, to the top of the vessel, to repeat the trip. Shapewise, you must use a round configured vessel. The most efficient shape is a cone shape with a drain hole at the bottom. Rather than go through a complex description of how to construct an air driven vortex brewer, I’m including this Internet link which illustrates a design by Steven Storch which he has offered up to the public;
http://www.subtleenergies.com/ormus/tw/turbo-vortex.htm One with engineering instincts will come up with a variety of ways to modify this design. For example this design can be transposed to a 50 gallon sized barrel with a drain hole placed in the bottom. You would of course need a larger air pump and need to set the barrel up on blocks or legs. These systems produce a full compliment of microbes (bacteria/archaea, protozoa and fungal hyphae).[/SIZE]
[SIZE=-1]One can also create a vortex brewer using a water pump to return the water to the top of the vessel again. Very handy if that is what you have laying around in your junk pile. The advanced thinkers will have already mindfully jumped to the idea that including a venturi with a water pump driven vortex is going to increase its efficiency exponentially. Well….at least a lot. Give yourself a gold star, a pat on the back, a chocolate cookie. Bear in mind, that if you use a water pump you will limit fungal hyphae extraction and growth.[/SIZE]
3a/[SIZE=-1][SIZE=+1] Simple Airlift - Vortex: [/SIZE][SIZE=+1]done my way[/SIZE]
I've had many requests to provide a simple design for an airlift brewer. This sketch of a simple design cone bottom tank brewer can be applied to just about any size brewer. Just don't start selling them or I'll have to sue you.
If you wish to create a vortex using this design make sure you use a round shaped tank and position the return nozzle (elbow) so it is directional to the flow desired. This can be reversed by twisting the elbow and tweaked by using a short length of pipe as an extension. I'll try to post some photos shortly.
4/ [SIZE=+1]Bubble Blowers;[/SIZE] There are 2 basic styles of commercial bubble blower CT brewers. What I mean by bubble blowers, is that their function depends on just that; blowing bubbles into the water, into a mesh extractor or both. They do not actively move the water, aside from the effect of the bubbles. Because of this, I find it a paradox that they refer to their units as AACT (actively aerated compost tea) brewers to separate themselves from only, aerated compost tea (ACT) brewers, which supposedly just blow air into water. This remains a mystery unto me. I won’t name these brewers because they include almost every commercial brewer available, except mine of course, which should be separated from those by being called an AAACT brewer (giggle). No offense; just kidding around.
Anyway, back to business. A very simple method you can use to make an aerated CT brewer is to use some rigid PVC thin walled pipe (not schedule 40 because it is difficult to make tiny holes in) of approximately ½ inch to ¾ inch size. Rigid pipe is better than flex pipe because it holds its shape, can be cleaned more easily and is easier to drill and saw. Use a straight piece which is approximately as long as your proposed tank is high, joined to a 90* elbow, then following the dimensional circumference of the bottom of your tank build a roughly round hexagon or octagon or whateveragon alternating with PVC fittings (45* or 11*, 22* to 30* if you can find them http://pvcfittings.com ) and short lengths of pipe, terminating just before you hit the elbow which the long pipe slides into. Over the end of this last piece of pipe in your whateveragon slide a cap. None of this needs to be glued (usually) because we are not dealing with high pressure and the whole thing can be taken apart for easy cleaning. We now need three more things. An air supply, an air input interface with the pipe and diffusers. A diffuser is an interface between air and water which ‘diffuses’ of course, air into the water. No matter what name people give it, like orifice or air stone, hole, slit or slot, it is still a diffuser. The smaller the diffuser opening within the capacity of the air pump to push air through easily, the greater the efficiency at raising and maintaining the dissolved oxygen. Therefore you want to put the smallest holes or slits possible at intervals in the short pieces of pipe you used to construct your whateveragon. If you have an electric drill you can drill 1/16th inch holes. You can try cutting slits with a razor knife or very fine hack saw or other blade. A hacksaw cuts around 1000 microns width. I get machined slots which are 254 microns. Make your openings so they are coming out the bottom angled towards the center to begin with. (The pipe is not glued so you can rotate them). For your first trial only put a few air openings in each length of pipe (e.g. 2†spaces). We want the air traveling all the way to the end of the whateveragon. Now to try it out, I guess we better get some air happening.
First of all, for your air input you need to match air tubing with your air pump and get a threaded barbed fitting that the tubing fits over and a slip X female threaded coupling to go over your long straight piece of PVC pipe which goes down and joins to your whateveragon. This, you may need to glue.
I have provided a rudimentary representative sketch to help illustrate the basic construction >click here
[SIZE=+1]A Word About Diaphragm Air Pumps;[/SIZE]
If you are going to buy a pump to run your aerated CT brewer I now (as of Feb 2015) recommend the Elemental line of commercial air pumps. Like ECO commercial air they are a combination piston and rubber (diaphragm) pump but they are quieter and seem to out perform the ECOs for the same price range. The Elemental 951 gph which we are using with our Mini-Microbulator outputs 2.5 CFM and the 1744 gph which we will be using with our 50 gallon airlift Microbulator measures an average 5.3 CFM (ECO 5 is 4.0 CFM). On top of that, these pumps are painted and it seems there is a higher standard applied to their manufacture. In the USA you can purchase this line through buildasoil.com. If there is enough demand we will sell these pumps in (from) Canada
I can also recommend Hailea 9730 pumps (2 CFM max.) which you can purchase from www.aquaticeco.comand other places. These are solid, long lasting pumps and I know other commercial brewers use them for 50 gallons but I just can’t recommend them for more than 30 gallons. If you use one for a 5 gallon unit it will last virtually forever. All of these pumps come with a little threaded brass fitting for screwing into the air output. DO NOT USE THESE! Put them in your parts drawer. These constrict the air and reduce your CFM by at least 20%. Rather, find tubing which slides over the nipple into which the threads are tapped. In the case of the Eco Plus 5 and the Hailea, 5/8ths inside diameter works. Slide the air tubing over and secure with a gear clamp. The Eco Plus has a very short nipple so I score the metal with a couple of swipes with a hacksaw to create barbs for the tubing to grip. You can find tubing at a building supply like Home Depot or Rona in Canada. I use the braided reinforced stuff which does not kink. Always try to keep your pump at or above the surface of the water so it does not siphon back if the power fails.
Now that we have our air supply you can slide the tubing over the barbed fitting air input on the end of your straight piece of PVC and fire her up. Ooops! Forgot the spring clamp. You can use a spring clamp to pinch the long PVC air pipe to the edge of your tank at the top. This keeps the hole thing from floating and you can adjust the distance your whateveragon is from the bottom. Spring clamps are like giant clothes pegs http://www.leevalley.com/wood/page.aspx?c=1&cat=1,43838&p=41712
http://www.hobbytool.com/springclamps.aspx
I’m sure you can find them at Home Depot too or you may think up another idea (like a ‘C’ clamp).
Okay fire up the pump and fill up your tank (pail, barrel) with water. Watch the amount of air coming out of the openings you made. What we want is air coming out right to the end of the whateveragon and even dispersal all around and we want really broiling water bubbling up to the surface. The reason I suggested angling the openings on the bottom towards the center of the tank is so it would sweep right up from the base. You can raise it closer to the surface to get a better look at how evenly the air is coming out. You can also just put the air tube end in the water, right to the bottom so you can get an idea of your air potential and how much should be coming out of the holes you made. You don’t want to restrict the air flow. If you feel comfortable that you need more air coming out start adding more openings (on top), beginning at the cap end on the top of the pipe and working your way around towards the air input. You’ll get the hang of it. If you screw up, no biggy cause you are using really short pieces of very cheap pipe, not glued and you can redo and experiment to your heart’s content.
This is very similar to the KIS 5 gallon brewer (a very efficient little brewer; buy one if you don't like doing this) so their compost brew kits will be ideal to use with this. You can use this system with compost and feedstock in free suspension (added directly to the water) or in the case of a 5 gallon set up you can probably get away with placing your compost and solid food into a mesh bag tightly tied up and floating around in the water. The turbulence may keep it suspended. You could put some fishing floats or ping pong balls in it to be sure it won’t sink.
If you wish to use an extractor bag with a larger brewer, then you can use a variation of the set up previously described, except that you have a PVC air line entering your (tube/sock shaped) mesh extractor bag with diffuser openings close to the bottom of the bag and with a cap on the end of the pipe. This pipe should go very close to the bottom of the bag. You will need to tie off or fashion a lid for the extractor bag or keep the top above the water surface. As stated previously, 400 microns is the optimum sized mesh to use. You may purchase a variety of mesh bags from http://www.aquaticeco.com . You can experiment with the number of diffuser openings which provides sufficient agitation. These types of systems depend upon the agitation of the compost against the mesh, caused by the air, to extract the microbes from the compost. Some systems have no additional air diffusion outside of the mesh extractor, while others incorporate one or more additional diffusers. One could TEE off from the air line, one diffuser going into the mesh bag, the other into the water. A valve to regulate the air flow would be necessary in this case. Alternatively one could use two air pumps. One could combine both designs, using a whateveragon diffuser and another pipe going into the mesh extractor.
[SIZE=+1]Diffusers;[/SIZE]
One could incorporate good quality glass bonded diffusers if one did not wish to mess with PVC pipes and making their own diffusers. These diffusers are resistant to break down by microbes and can be cleaned with muriatic acid (but are not environmentally friendly to clean). They are called Sweetwater medium bore diffusers and are available at http://www.aquaticeco.com . They are far superior to homemade PVC diffusers in terms of sustaining DO2 because they produce finer bubbles . There is no truth (that I have seen) to the statement that fine bubbles damage some microbes.
[SIZE=+1]Anaerobes;[/SIZE]
Many people are overly anxious about having any anaerobic microbes in their CT. If you have a tremendous number of ciliates in your CT, or if it stinks to high heavens, there is a likelihood that your CT has gone anaerobic and you should toss it. However, I would not worry about seeing a healthy number of ciliates (if you have a microscope), especially if there are also high numbers of flagellates and/or amoebae. Additionally anaerobic (facultative and obligate) bacteria and archaea occur naturally in the soil and other environments and their existence is part of the balance of nature so don’t worry if you have a few in your consortia.
[SIZE=+1]Cleaning;[/SIZE]
You should clean out your brewer after each use, especially the extractor bag if you use one.
[SIZE=+1]Conversions;[/SIZE]
1 US gallon = 3.78 litres (liters)
1 US quart = 0.946 litre (liter)
1 micrometer or micron (µm) = 0.000039 inch (39/100000ths)
For converting mesh to microns: http://chemplazaonline.com/meshsizecoverter.aspx
I think I’ve covered the basics. If anyone has any suggestions or if you notice any errors, please speak up.[/SIZE]
http://www.microbeorganics.com/#So_Y...ost_Tea_Brewer
https://buildasoil.com/blogs/news/15...structions-diy
https://youtu.be/pKj7LV3hgrQ
[SIZE=-1][SIZE=+2]So You Wanna Build A Compost Tea Brewer[/SIZE]
Terms:
* = degree(s); CT = compost tea; ACT = aerated compost tea; O2 = oxygen; CO2 = carbon dioxide
DO2 = dissolved oxygen; CFM = cubic feet per minute; PPM = parts per million
There are several ways to make your own compost tea brewer which may not produce the equivalent results to some commercially available models but should provide you with a microbial extract you can apply to your soil and plants. When I first started messing around with brewers, I experimented with what we had lying in our various junk heaps around the farm; cast-offs from buying the wrong part at the plumbing store, outdated irrigation systems, left over pipe, dead vehicles and other modern broken things. Therefore, if you are a junk collector like me, you may already have much of what you require to build a compost tea brewer.
First of all I’d like to make it clear that most aquarium air pumps don’t produce enough air to use in a container larger than 1 gallon when considering making an aerated brewer. So don’t even try the 5 gallon pail with the aquarium pump idea everybody is passing around. You need a minimum 0.05 CFM (cubic feet per minute), open flow of air and an optimum 0.08 CFM per gallon (US) or higher to make aerated compost tea (ACT). ACT should have the DO2 sustained at or above 6 PPM. Generally, aquarium pumps produce around 0.02 to 0.16 CFM. Another generality is that 25 watts of power usually produces 0.75 to 1.0 CFM in diaphragm air pumps. The wattage is usually marked on the pump which will help you figure out the approximate output. I’ll cover more on air pumps later.
In the following I will outline some simple methods of building a variety of compost tea makers. I am not going to discuss anaerobic methods at this time. Later on I may add some sketches.
1/ [SIZE=+1]Stir Method:[/SIZE] The cheapest way to make compost tea is the old fashioned way. Just add compost to clean, non-chlorinated, water (above 65 degrees F. recommended) and stir like mad with a clean stick or whathaveyou. I’d recommend using about 3 to 5% compost by volume of water and stir it up as often as you can over an 8 to 12 hour period. Some people do it over a 24 hour period and also add some foodstock like molasses, fish hydrolysate and kelp. You can experiment with different times and ingredients and decide for yourself. If you have a microscope, check it out. When you feel that you have a completed compost tea (CT) you can remove it in several ways. If you have just used a 5 gallon pail you can simply let the particulate matter settle and pour the clearer CT off into watering cans or your sprayer.
[SIZE=+1]Filtering;[/SIZE]
You can place a submersible pump into a mesh bag as a screen, drop it into the tank (barrel, pail) and pump the CT out. I use a regular cheap sump pump for this with a 800 to 1000 micron mesh bag (about the size of window screen) See the testing I did; [/SIZE]Does Microbial Life Survive Pump Impellers?[SIZE=-1] . You can purchase mesh bags at www.aquaticeco.com or make your own. Likewise, you can filter the CT by placing the same size screen over top of another pail and pour or siphon the CT through the mesh into the other vessel. If residue builds up, stop and clean off the mesh. As residue builds up it stops the passage of the microbes you want. Never run CT through a pipe constrained filter unless essential as part of your irrigation system or spray rig.
2/[SIZE=+1] The Venturi Method:[/SIZE] If you only have a water pump and wish to make a compost tea brewer you can inject air into the water by using a venturi. I have provided a sketch and text showing how to make your own or you can purchase them from http://www.aquaticeco.com . Basically the venturi creates a vacuum which interfaces with the water as it passes by, sucking air and mixing it with the water. It is quite an efficient method of oxygenating water. If you have a really tough water pump which does not clog, like a trash pump, you may run this type of brewer without a mesh extractor bag. Most are going to want to use a mesh extractor, so I recommend TEEing your water line downstream from the venturi with one return line suspended above the water and the other return line going into the mesh extractor. Undoubtedly you will require a valve to regulate the flow so all of the water does not just take the easiest route to the pipe suspended over the water. To build a CT brewer beyond the stir method, some basic knowledge of fitting plumbing parts and pipes together is essential, as well as some engineering instincts. If you are not up for this just save yourself the aggravation and buy a brewer. You may use your imagination for a mesh extractor. For a small brewer of 100 gallons or less, 400 microns is an ideal mesh size. Sometimes for large brewers which may run for several days to establish a functional nutrient cycling consortia a larger mesh size like 800 µm may be a better choice. This is because, as noted above, the mesh may clog up a little over time. A friend of mine successfully brewed CT using this method in a 5000 gallon brewer for many years. He used 2, barrel sized mesh extractor bags sewn from landscape cloth. He ran a return line into each bag, which was ¾ full of compost and tied off each bag tightly around the pipe so nothing could get out the top. These were dropped into the water (with his tractor) and 2 other return pipes pumped in oxygenated water. You can use your imagination to create mesh extractors, dependent on the size of your brewer, the materials at hand and what works for you. You can even create a basket which is partially above the surface to prevent particulate escape. These systems are not great for extracting and growing fungal hyphae but they produce bacteria/archaea and protozoa just fine.
[SIZE=+1]The Gas Exchange;[/SIZE]
The reason for suspending the other pipe(s) above the water is so it splashes into the water, breaking the water’s surface tension and additionally pushing more air into the water like a water fall or running river does. The surface tension of water is unique in its toughness; it surpasses that of oil. When I first started experimenting with the venturi method I had the return pipe submerged. The effects were profound. As the water filled with air, generated by the venturi, the water level rose, even over flowing my 1200 gallon tank. At the time, I thought this was a good sign that I was oxygenating the water. Sure, I was getting air in but was not getting the maximum dissolved oxygen possible with my system. Later when I learned that gas exchange means, ‘trading one gas for another’, I realized that the surface tension must be broken for the optimum gas exchange to occur. In this case, we are trading carbon dioxide (CO2) for oxygen (O2) or dissolved oxygen (DO2). CO2 must make way for DO2. In water, CO2 has two ways of being dissipated (of which I am aware). It is either used by organisms, like water plants or it must escape at the surface interface. In a brewer we have no plants and the microbes we are growing use O2 and create CO2, so the CO2 must escape at the surface. Because of the high surface tension of water, if we break the surface, this escape or release is facilitated and we improve the efficiency of our CT brewer. Once we started suspending the return pipe above the surface, providing a hardy splash to break the surface, we had no further over flows and the DO2 increased. NOTE: This principle applies to air driven brewers as well. The better the surface tension is broken, the better the capacity to contain DO2 in the water.
3/ [SIZE=+1]The Vortex Method: [/SIZE]There are many who claim that running water in a vortex pattern comprised of multiple mini vortices changes the properties of water beneficially. I remain dubious but open-minded. You can form your own opinion on this subject. One thing a vortex brewer is very good for is ensuring a full circulation of all the water and compost added. There can be no ‘dead zones’; none of the feared anaerobic pockets!! There is no point to considering the use of a mesh extractor with a vortex brewer unless you conceive of some genius method of suspending a mesh container in the center of the flow. Therefore this design is for those of you who don’t mind using compost in free suspension and deal with the particulate matter later. A vortex action in a CT brewer is pretty much dependent on the shape of the vessel used, combined with the direction of the input flow ‘nozzles’ or pipe ends and finally on the ability of the design to empty from a centrally located opening at the bottom of the vessel and the return of the water emptied, to the top of the vessel, to repeat the trip. Shapewise, you must use a round configured vessel. The most efficient shape is a cone shape with a drain hole at the bottom. Rather than go through a complex description of how to construct an air driven vortex brewer, I’m including this Internet link which illustrates a design by Steven Storch which he has offered up to the public;
http://www.subtleenergies.com/ormus/tw/turbo-vortex.htm One with engineering instincts will come up with a variety of ways to modify this design. For example this design can be transposed to a 50 gallon sized barrel with a drain hole placed in the bottom. You would of course need a larger air pump and need to set the barrel up on blocks or legs. These systems produce a full compliment of microbes (bacteria/archaea, protozoa and fungal hyphae).[/SIZE]
[SIZE=-1]One can also create a vortex brewer using a water pump to return the water to the top of the vessel again. Very handy if that is what you have laying around in your junk pile. The advanced thinkers will have already mindfully jumped to the idea that including a venturi with a water pump driven vortex is going to increase its efficiency exponentially. Well….at least a lot. Give yourself a gold star, a pat on the back, a chocolate cookie. Bear in mind, that if you use a water pump you will limit fungal hyphae extraction and growth.[/SIZE]
3a/[SIZE=-1][SIZE=+1] Simple Airlift - Vortex: [/SIZE][SIZE=+1]done my way[/SIZE]
I've had many requests to provide a simple design for an airlift brewer. This sketch of a simple design cone bottom tank brewer can be applied to just about any size brewer. Just don't start selling them or I'll have to sue you.
If you wish to create a vortex using this design make sure you use a round shaped tank and position the return nozzle (elbow) so it is directional to the flow desired. This can be reversed by twisting the elbow and tweaked by using a short length of pipe as an extension. I'll try to post some photos shortly.
4/ [SIZE=+1]Bubble Blowers;[/SIZE] There are 2 basic styles of commercial bubble blower CT brewers. What I mean by bubble blowers, is that their function depends on just that; blowing bubbles into the water, into a mesh extractor or both. They do not actively move the water, aside from the effect of the bubbles. Because of this, I find it a paradox that they refer to their units as AACT (actively aerated compost tea) brewers to separate themselves from only, aerated compost tea (ACT) brewers, which supposedly just blow air into water. This remains a mystery unto me. I won’t name these brewers because they include almost every commercial brewer available, except mine of course, which should be separated from those by being called an AAACT brewer (giggle). No offense; just kidding around.
Anyway, back to business. A very simple method you can use to make an aerated CT brewer is to use some rigid PVC thin walled pipe (not schedule 40 because it is difficult to make tiny holes in) of approximately ½ inch to ¾ inch size. Rigid pipe is better than flex pipe because it holds its shape, can be cleaned more easily and is easier to drill and saw. Use a straight piece which is approximately as long as your proposed tank is high, joined to a 90* elbow, then following the dimensional circumference of the bottom of your tank build a roughly round hexagon or octagon or whateveragon alternating with PVC fittings (45* or 11*, 22* to 30* if you can find them http://pvcfittings.com ) and short lengths of pipe, terminating just before you hit the elbow which the long pipe slides into. Over the end of this last piece of pipe in your whateveragon slide a cap. None of this needs to be glued (usually) because we are not dealing with high pressure and the whole thing can be taken apart for easy cleaning. We now need three more things. An air supply, an air input interface with the pipe and diffusers. A diffuser is an interface between air and water which ‘diffuses’ of course, air into the water. No matter what name people give it, like orifice or air stone, hole, slit or slot, it is still a diffuser. The smaller the diffuser opening within the capacity of the air pump to push air through easily, the greater the efficiency at raising and maintaining the dissolved oxygen. Therefore you want to put the smallest holes or slits possible at intervals in the short pieces of pipe you used to construct your whateveragon. If you have an electric drill you can drill 1/16th inch holes. You can try cutting slits with a razor knife or very fine hack saw or other blade. A hacksaw cuts around 1000 microns width. I get machined slots which are 254 microns. Make your openings so they are coming out the bottom angled towards the center to begin with. (The pipe is not glued so you can rotate them). For your first trial only put a few air openings in each length of pipe (e.g. 2†spaces). We want the air traveling all the way to the end of the whateveragon. Now to try it out, I guess we better get some air happening.
First of all, for your air input you need to match air tubing with your air pump and get a threaded barbed fitting that the tubing fits over and a slip X female threaded coupling to go over your long straight piece of PVC pipe which goes down and joins to your whateveragon. This, you may need to glue.
I have provided a rudimentary representative sketch to help illustrate the basic construction >click here
[SIZE=+1]A Word About Diaphragm Air Pumps;[/SIZE]
If you are going to buy a pump to run your aerated CT brewer I now (as of Feb 2015) recommend the Elemental line of commercial air pumps. Like ECO commercial air they are a combination piston and rubber (diaphragm) pump but they are quieter and seem to out perform the ECOs for the same price range. The Elemental 951 gph which we are using with our Mini-Microbulator outputs 2.5 CFM and the 1744 gph which we will be using with our 50 gallon airlift Microbulator measures an average 5.3 CFM (ECO 5 is 4.0 CFM). On top of that, these pumps are painted and it seems there is a higher standard applied to their manufacture. In the USA you can purchase this line through buildasoil.com. If there is enough demand we will sell these pumps in (from) Canada
I can also recommend Hailea 9730 pumps (2 CFM max.) which you can purchase from www.aquaticeco.comand other places. These are solid, long lasting pumps and I know other commercial brewers use them for 50 gallons but I just can’t recommend them for more than 30 gallons. If you use one for a 5 gallon unit it will last virtually forever. All of these pumps come with a little threaded brass fitting for screwing into the air output. DO NOT USE THESE! Put them in your parts drawer. These constrict the air and reduce your CFM by at least 20%. Rather, find tubing which slides over the nipple into which the threads are tapped. In the case of the Eco Plus 5 and the Hailea, 5/8ths inside diameter works. Slide the air tubing over and secure with a gear clamp. The Eco Plus has a very short nipple so I score the metal with a couple of swipes with a hacksaw to create barbs for the tubing to grip. You can find tubing at a building supply like Home Depot or Rona in Canada. I use the braided reinforced stuff which does not kink. Always try to keep your pump at or above the surface of the water so it does not siphon back if the power fails.
Now that we have our air supply you can slide the tubing over the barbed fitting air input on the end of your straight piece of PVC and fire her up. Ooops! Forgot the spring clamp. You can use a spring clamp to pinch the long PVC air pipe to the edge of your tank at the top. This keeps the hole thing from floating and you can adjust the distance your whateveragon is from the bottom. Spring clamps are like giant clothes pegs http://www.leevalley.com/wood/page.aspx?c=1&cat=1,43838&p=41712
http://www.hobbytool.com/springclamps.aspx
I’m sure you can find them at Home Depot too or you may think up another idea (like a ‘C’ clamp).
Okay fire up the pump and fill up your tank (pail, barrel) with water. Watch the amount of air coming out of the openings you made. What we want is air coming out right to the end of the whateveragon and even dispersal all around and we want really broiling water bubbling up to the surface. The reason I suggested angling the openings on the bottom towards the center of the tank is so it would sweep right up from the base. You can raise it closer to the surface to get a better look at how evenly the air is coming out. You can also just put the air tube end in the water, right to the bottom so you can get an idea of your air potential and how much should be coming out of the holes you made. You don’t want to restrict the air flow. If you feel comfortable that you need more air coming out start adding more openings (on top), beginning at the cap end on the top of the pipe and working your way around towards the air input. You’ll get the hang of it. If you screw up, no biggy cause you are using really short pieces of very cheap pipe, not glued and you can redo and experiment to your heart’s content.
This is very similar to the KIS 5 gallon brewer (a very efficient little brewer; buy one if you don't like doing this) so their compost brew kits will be ideal to use with this. You can use this system with compost and feedstock in free suspension (added directly to the water) or in the case of a 5 gallon set up you can probably get away with placing your compost and solid food into a mesh bag tightly tied up and floating around in the water. The turbulence may keep it suspended. You could put some fishing floats or ping pong balls in it to be sure it won’t sink.
If you wish to use an extractor bag with a larger brewer, then you can use a variation of the set up previously described, except that you have a PVC air line entering your (tube/sock shaped) mesh extractor bag with diffuser openings close to the bottom of the bag and with a cap on the end of the pipe. This pipe should go very close to the bottom of the bag. You will need to tie off or fashion a lid for the extractor bag or keep the top above the water surface. As stated previously, 400 microns is the optimum sized mesh to use. You may purchase a variety of mesh bags from http://www.aquaticeco.com . You can experiment with the number of diffuser openings which provides sufficient agitation. These types of systems depend upon the agitation of the compost against the mesh, caused by the air, to extract the microbes from the compost. Some systems have no additional air diffusion outside of the mesh extractor, while others incorporate one or more additional diffusers. One could TEE off from the air line, one diffuser going into the mesh bag, the other into the water. A valve to regulate the air flow would be necessary in this case. Alternatively one could use two air pumps. One could combine both designs, using a whateveragon diffuser and another pipe going into the mesh extractor.
[SIZE=+1]Diffusers;[/SIZE]
One could incorporate good quality glass bonded diffusers if one did not wish to mess with PVC pipes and making their own diffusers. These diffusers are resistant to break down by microbes and can be cleaned with muriatic acid (but are not environmentally friendly to clean). They are called Sweetwater medium bore diffusers and are available at http://www.aquaticeco.com . They are far superior to homemade PVC diffusers in terms of sustaining DO2 because they produce finer bubbles . There is no truth (that I have seen) to the statement that fine bubbles damage some microbes.
[SIZE=+1]Anaerobes;[/SIZE]
Many people are overly anxious about having any anaerobic microbes in their CT. If you have a tremendous number of ciliates in your CT, or if it stinks to high heavens, there is a likelihood that your CT has gone anaerobic and you should toss it. However, I would not worry about seeing a healthy number of ciliates (if you have a microscope), especially if there are also high numbers of flagellates and/or amoebae. Additionally anaerobic (facultative and obligate) bacteria and archaea occur naturally in the soil and other environments and their existence is part of the balance of nature so don’t worry if you have a few in your consortia.
[SIZE=+1]Cleaning;[/SIZE]
You should clean out your brewer after each use, especially the extractor bag if you use one.
[SIZE=+1]Conversions;[/SIZE]
1 US gallon = 3.78 litres (liters)
1 US quart = 0.946 litre (liter)
1 micrometer or micron (µm) = 0.000039 inch (39/100000ths)
For converting mesh to microns: http://chemplazaonline.com/meshsizecoverter.aspx
I think I’ve covered the basics. If anyone has any suggestions or if you notice any errors, please speak up.[/SIZE]
Last edited:
Paracelsus
New member
by Stephen Storch
Introduction
I graduated from Southampton College of Long Island University in 1980 with a Bachelor of Science in Marine Science, Biology concentration. Worked for over a decade in the commercial fishing industry. Declines in fisheries and disappointment in science led me into the landscape and tree service industry. Though the mentality was no better their I was able to make inroads and connections which enabled me to work according to my own standards.
After marrying into a 12th generation farm family in Water Mill I began to apply my scientific insights into compost making and was introduced to biodynamics in 1987. Since then the world of subtle energy and earth healing has had my undivided attention.
Turbo-Vortex Compost Tea Brewer
On the farm I build hydraulic stirring machines for the biodynamic remedies and can stir eighty gallons per machine applicable to twenty five acres at a time. After hearing Elaine Ingham on compost teas I began to use my knowledge of water dynamics to build compost tea brewers. [These devices are also useful for potientiating other water based liquids.] I continue to work and learn in these fields and incorporate the work of Steiner, Schauberger, Riech, Pfieffer, Herbe and others into an advanced, results oriented earth healing methodology.
I build them from stock components. From water cooler bottle size to 5000 gallons and up. From a central drain four lift tubes are attached with the air diffusers down each tube. The rising air moves the water and creates a vortex. You can manually turn the nozzles so you can go clockwise or counter clockwise. It can be done automatically but that gets pricey.
I had them at acres, the Miracle II booth had a conductivity meter and the shitty water at the hotel was vastly improved by the action and with additions of 508, 501, or basalt.
Q: Steve, this sounds interesting. Assume that you wanted to make a small garden-sized device. Use a plastic water cooler bottle and cut off the top?
A: Not the top, the bottom. Leave the part that turns in and cut the center out, use a jig saw. The water cooler bottle is polycarbonate and the best material.
Q: Or just just a 3 gal plastic bucket? Would a nonplastic be better, like a ceramic crock?
A: These would be ok but you won't be able to do the same style with the stone without some difficulty.
Q: How many diffuser tubes of what size?
A: For a standard water cooler bottle use inch and a half schedule 40 pvc. The bottom piece that adapts to the bottle has to be custom made. That is a cross piece with the top center drilled out to fit a 1 1/2 coupling that is glued in place and the excess on the inside is filed off. If you don't understand that I can send that to you.
Q: How much air flow do you need?
A: You want about 100 liters per minute for the four diffusers
Q: What are the nozzles?
A: Those are the returns where the flow comes out, just the opening of the pipe.
Q: Do you use stock plastic for the risers?
A: Yes, 1 1/2 sch 40 pvc
Q: Is the drain also a tube?
A: The drain is where the vortex goes that feeds into the top of the cross.
Q: Do you keep the compost in a mesh or let it float loose?
A: I do both.
Q: Can you post a sketch?
A: I will try to post a picture, maybe Allen can put it on his site.
Q: I guess you run it in one direction for a while then change the nozzle, so there isn't a lot of chaos/counter flow. Is that right?
A: It creates a beautiful vortex. If you take off the pieces that direct the flow it tends towards chaos. If you assist by stirring it makes a vortex, stop, goes to chaos, reverse, etc.
Q: Where do the bubble tubes go and where do the bubble stones sit?
A: The air diffusers drop down into the vertical legs of the brewer, I like them to be close to the bottom of the tubes.
Q: What do you change when you reverse the direction of spin?
A: Inside the brewer is where you can manually spin the 45 degree elbows.
Q: Ok, so I see the gravity flow, but it sounds like you have a stand pipe or more to give the upthrust necessary to raise the fluid to the next level. If this occurs then at some point the stand pipe will create suction and the denser material will be carried down the pipe center while the lighter is expelled along the periphery; creating its' own vortex within the pipe flow. Is this correct?
A: The water seeks its own level in the set-up, the air displaces the water, creating lift and suction, you will see from the photos.
For those less than handy I will build them and ship any size with a list of components.
Stephen Storch
Natural Science Organic
P.O. Box, 467
Water Mill, NY 11976
631-726-6783
appbiodyn@aol.com
http://www.subtleenergies.com/ormus/tw/turbo-vortex.htm
Paracelsus
New member
The beginning of BioDynamics
An audio recording of several lectures by Ruldolph Steiner given between June 7th & June 20th 1924 some many years before the movement and revival towards organic farming flourished
http://www.rudolfsteineraudio.com/agriculture/agriculture.html
An audio recording of several lectures by Ruldolph Steiner given between June 7th & June 20th 1924 some many years before the movement and revival towards organic farming flourished
http://www.rudolfsteineraudio.com/agriculture/agriculture.html
Paracelsus
New member
Is it a Blood Orange Tree or a sprout of Clover?
February 28, 2018 6am
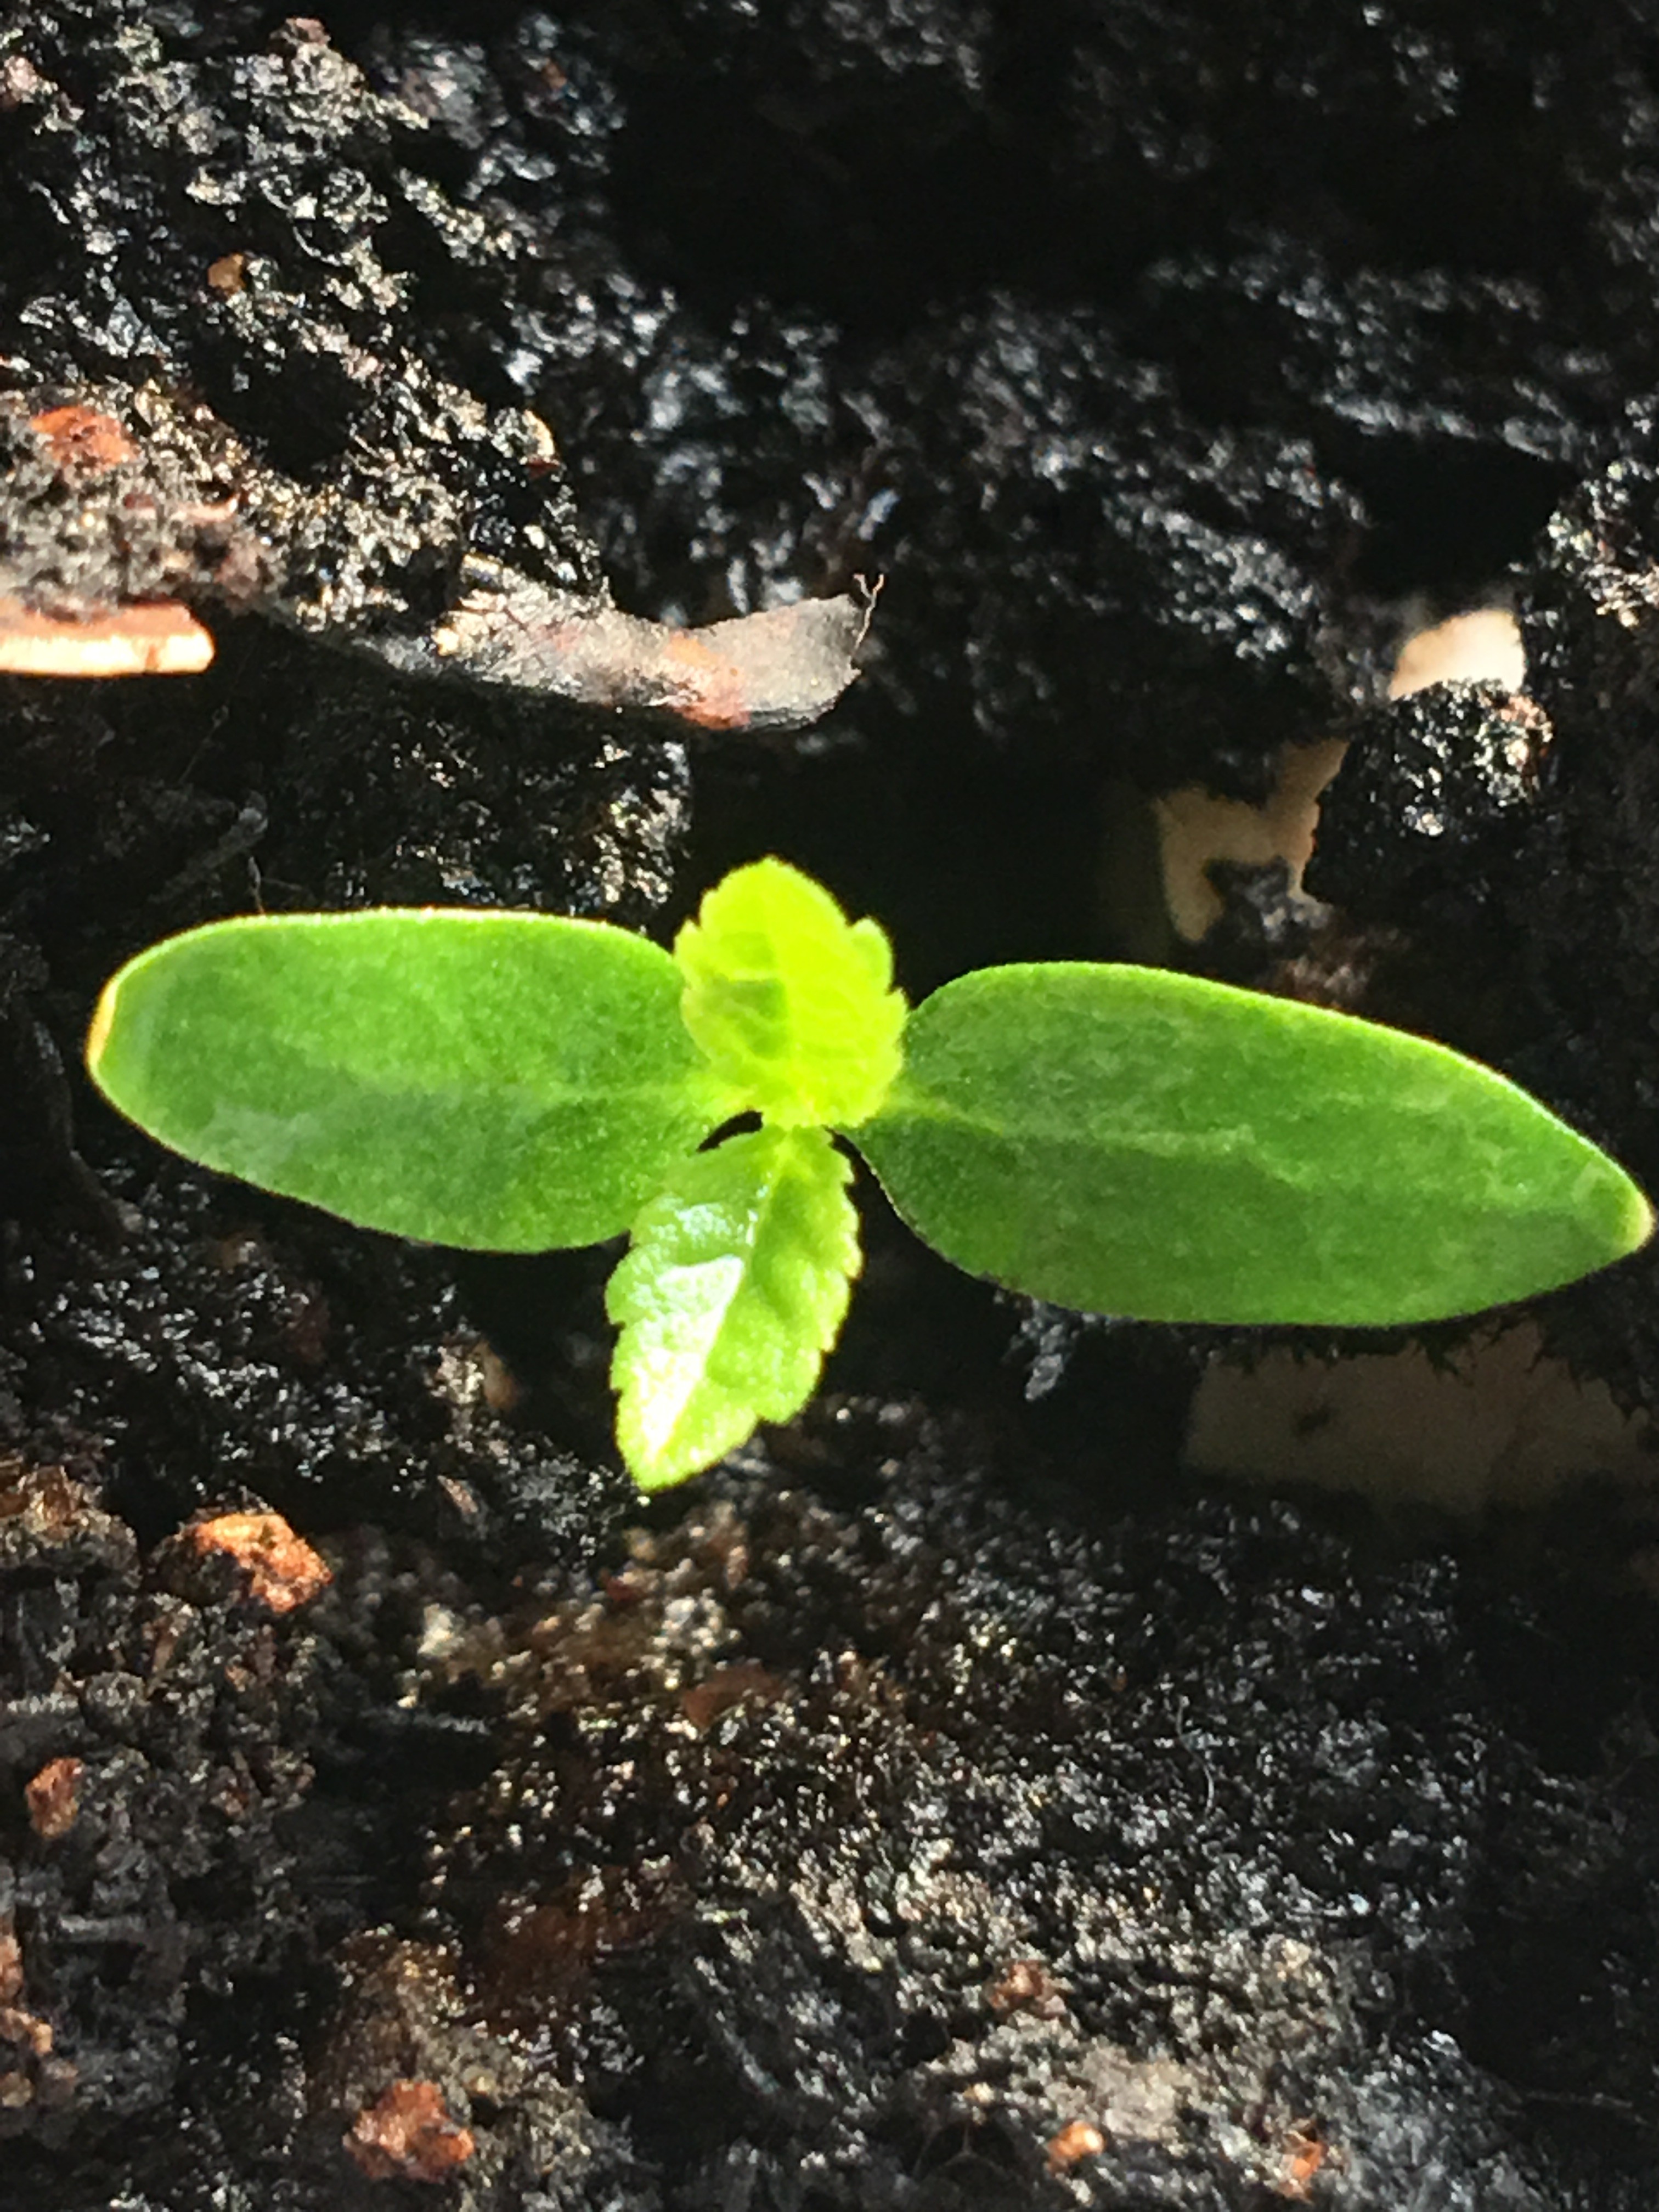
February 28, 2018 6am
Last edited:
Paracelsus
New member
Incoming, it’s new Dirt day ! NDD!
[TABLE="border: 0, cellpadding: 0, cellspacing: 0"]
[TR]
[TD] [TABLE="cellpadding: 10, cellspacing: 0"]
[TR]
[TD="width: 50%"]Ship date[/TD]
[TD="width: 50%"]2/23/2018[/TD]
[/TR]
[TR]
[TD="width: 50%"]Scheduled delivery[/TD]
[TD="width: 50%"]2/28/2018[/TD]
[/TR]
[TR]
[TD="width: 50%"]Service type[/TD]
[TD="width: 50%"]FedEx Home Delivery[/TD]
[/TR]
[TR]
[TD="width: 50%"]Standard transit date[/TD]
[TD="width: 50%"]2/28/2018[/TD]
[/TR]
[/TABLE]
[/TD]
[/TR]
[TR]
[TD]
 [/TD]
[/TD]
[/TR]
[TR]
[TD]Tracking results as of Feb 28, 2018 6:39a GMT[/TD]
[/TR]
[TR]
[TD] [TABLE="cellpadding: 10, cellspacing: 0"]
[TR]
[TD="width: 50%"]Date/Time[/TD]
[TD="width: 50%"]Activity/Location[/TD]
[/TR]
[TR]
[TD]2/27/2018 9:07 pm[/TD]
[TD]Departed FedEx location[/TD]
[/TR]
[TR]
[TD] [/TD]
[TD]LONG ISLAND CITY, NY[/TD]
[/TR]
[TR]
[TD]2/27/2018 10:55 am[/TD]
[TD]Arrived at FedEx location[/TD]
[/TR]
[TR]
[TD] [/TD]
[TD]LONG ISLAND CITY, NY[/TD]
[/TR]
[TR]
[TD]2/25/2018 9:49 am[/TD]
[TD]In transit[/TD]
[/TR]
[TR]
[TD] [/TD]
[TD]MILLERSPORT, OH[/TD]
[/TR]
[TR]
[TD]2/24/2018 8:35 pm[/TD]
[TD]In transit[/TD]
[/TR]
[TR]
[TD] [/TD]
[TD]OAK GROVE, MO[/TD]
[/TR]
[TR]
[TD]2/24/2018 7:15 am[/TD]
[TD]Departed FedEx location[/TD]
[/TR]
[TR]
[TD] [/TD]
[TD]HENDERSON, CO[/TD]
[/TR]
[TR]
[TD]2/24/2018 1:17 am[/TD]
[TD]Arrived at FedEx location[/TD]
[/TR]
[TR]
[TD] [/TD]
[TD]HENDERSON, CO[/TD]
[/TR]
[TR]
[TD]2/23/2018 6:47 pm[/TD]
[TD]Left FedEx origin facility[/TD]
[/TR]
[TR]
[TD] [/TD]
[TD]MONTROSE, CO[/TD]
[/TR]
[TR]
[TD]2/23/2018 4:23 pm[/TD]
[TD]Arrived at FedEx location[/TD]
[/TR]
[TR]
[TD] [/TD]
[TD]MONTROSE, CO[/TD]
[/TR]
[TR]
[TD]2/23/2018 3:21 pm[/TD]
[TD]Picked up[/TD]
[/TR]
[TR]
[TD] [/TD]
[TD]MONTROSE, CO[/TD]
[/TR]
[/TABLE]
[/TD]
[/TR]
[/TABLE]
[TABLE="border: 0, cellpadding: 0, cellspacing: 0"]
[TR]
[TD] [TABLE="cellpadding: 10, cellspacing: 0"]
[TR]
[TD="width: 50%"]Ship date[/TD]
[TD="width: 50%"]2/23/2018[/TD]
[/TR]
[TR]
[TD="width: 50%"]Scheduled delivery[/TD]
[TD="width: 50%"]2/28/2018[/TD]
[/TR]
[TR]
[TD="width: 50%"]Service type[/TD]
[TD="width: 50%"]FedEx Home Delivery[/TD]
[/TR]
[TR]
[TD="width: 50%"]Standard transit date[/TD]
[TD="width: 50%"]2/28/2018[/TD]
[/TR]
[/TABLE]
[/TD]
[/TR]
[TR]
[TD]
[/TR]
[TR]
[TD]Tracking results as of Feb 28, 2018 6:39a GMT[/TD]
[/TR]
[TR]
[TD] [TABLE="cellpadding: 10, cellspacing: 0"]
[TR]
[TD="width: 50%"]Date/Time[/TD]
[TD="width: 50%"]Activity/Location[/TD]
[/TR]
[TR]
[TD]2/27/2018 9:07 pm[/TD]
[TD]Departed FedEx location[/TD]
[/TR]
[TR]
[TD] [/TD]
[TD]LONG ISLAND CITY, NY[/TD]
[/TR]
[TR]
[TD]2/27/2018 10:55 am[/TD]
[TD]Arrived at FedEx location[/TD]
[/TR]
[TR]
[TD] [/TD]
[TD]LONG ISLAND CITY, NY[/TD]
[/TR]
[TR]
[TD]2/25/2018 9:49 am[/TD]
[TD]In transit[/TD]
[/TR]
[TR]
[TD] [/TD]
[TD]MILLERSPORT, OH[/TD]
[/TR]
[TR]
[TD]2/24/2018 8:35 pm[/TD]
[TD]In transit[/TD]
[/TR]
[TR]
[TD] [/TD]
[TD]OAK GROVE, MO[/TD]
[/TR]
[TR]
[TD]2/24/2018 7:15 am[/TD]
[TD]Departed FedEx location[/TD]
[/TR]
[TR]
[TD] [/TD]
[TD]HENDERSON, CO[/TD]
[/TR]
[TR]
[TD]2/24/2018 1:17 am[/TD]
[TD]Arrived at FedEx location[/TD]
[/TR]
[TR]
[TD] [/TD]
[TD]HENDERSON, CO[/TD]
[/TR]
[TR]
[TD]2/23/2018 6:47 pm[/TD]
[TD]Left FedEx origin facility[/TD]
[/TR]
[TR]
[TD] [/TD]
[TD]MONTROSE, CO[/TD]
[/TR]
[TR]
[TD]2/23/2018 4:23 pm[/TD]
[TD]Arrived at FedEx location[/TD]
[/TR]
[TR]
[TD] [/TD]
[TD]MONTROSE, CO[/TD]
[/TR]
[TR]
[TD]2/23/2018 3:21 pm[/TD]
[TD]Picked up[/TD]
[/TR]
[TR]
[TD] [/TD]
[TD]MONTROSE, CO[/TD]
[/TR]
[/TABLE]
[/TD]
[/TR]
[/TABLE]

D.A.A.S.69
New member
Paracelsus, that machine must be awesome, all I've got is 2 small Bubblers aerating my worm compost teas, an my plants love any of those homemade teas, but a machine like that one, would do a tremendous job.

oldjarhead100
New member
@Paraceisus this looks like a great project thanks for the plans will have one up and running by spring
oldjarhead100
New member
What kinda dirt ?
Paracelsus
New member
I hope you do oldjarhead100, I have a lot on my plate so you will be making one way before me. I got tails coming out of my seeds. I will be putting them into some BAS LOSoil today !
Paracelsus
New member
Paracelsus
New member
Paracelsus
New member
48 “ x 4 T5 54watt fixture
Room temp 80f RH 55%
light schedule 12pm - 6am
soil distance 7†for now
then sunrise light from window till noon
4 x Vader Ocean Grown
4 x Jedi Ocean Grown
1 quart containers 3/4 filled with
BAS MALIBU Biodynamic Living Organic Soil hydrated 5 Days
BIODYNAMIC calendar sowing day
https://www.rhythmofnature.net/biody...dar-march-2018
Attachments

Last edited:
Paracelsus
New member
I began the germination process at 4:30 AM March 1 by soaking the seeds in water for 48 hours followed by putting them in paper towels for another 48 hours, dropping them into the soil approximitly 12 noon March 4th.
The first full moon of March is no ordinary full moon.
According to the Farmer’s Almanac, it’s actually called the full worm moon, a nickname given by Native Americans — the Algonquin tribes in particular — who used lunar phases to track the seasons.
“At the time of this Moon, the ground begins to softenenough for earthworm casts to reappear, inviting the return of robins and migrating birds— a true sign of spring,†the almanac reported. “Roots start to push their way up through the soil, and the Earth experiences a re-birth as it awakens from its winter slumber.â€
Attachments
Last edited:
Paracelsus
New member
D.A.A.S.69 when you have the time here is a full lesson on Biodynamic farming. The first part in France is in English with some heavy accents then it moves to farm school in Australia for in depth lessons on all the facets of Biodynamic agriculture. It was a great review for me and gave me amore in depth under standing of the science behind Steiner’s connection to the subtle life forces of our Cosmic universe.
D.A.A.S.69
New member
Paracelsus, thanks ,my friend, Good stuff,
When we first started growing outdoors, long time ago, we always put 2-3dead nice size fish in the bottom of our holes, an boy did we grow some monsters, too.
It's was planted very near the MsRiver, and we used river water only, to water with, no ph checking, it grew like, crazy, and still does. Your soil is Everything. Lol.
You want to do some serious reading, ?? Read about MsDelta, alluvial plains soil, one small area in Ms. That's got it, not to be confused with MsRiver Delta soil, the alluvial soil is alot more fertile than the MsRiver Delta soil. If you can believe that.
When we first started growing outdoors, long time ago, we always put 2-3dead nice size fish in the bottom of our holes, an boy did we grow some monsters, too.
It's was planted very near the MsRiver, and we used river water only, to water with, no ph checking, it grew like, crazy, and still does. Your soil is Everything. Lol.
You want to do some serious reading, ?? Read about MsDelta, alluvial plains soil, one small area in Ms. That's got it, not to be confused with MsRiver Delta soil, the alluvial soil is alot more fertile than the MsRiver Delta soil. If you can believe that.
Last edited:
Paracelsus
New member
outside temperature 32f H 57%
indoor temperature 77f. RH 60%