What's new
GrowWeedEasy.com
You're browsing as a guest. Sign up to join the conversation, share your grows, and get help from thousands of fellow growers — it's free and takes less than a minute.

GJ#7 - First time top-fed DWC / Custom Grow Cabinet / Berry Bomb

JohnC

New member
Good morning fellow growers!

Starting another grow today. Although this is my 7th grow overall, this is my very first time with a top-fed DWC. I've been reading, reading some more, and then reading some more. So I hope I got it right.
  • Strain: Berry Bomb (Indica-dominant hybrid, feminized seed from Bomb Seeds)
  • Medium: Hydroton in net pot; 10-gallon reservoir with 5 gallons water.
  • Light: G8LED 240-watt full-spectrum LED; suspended 20 inches above net pot; supplemented by 90-watt UFO lamp for flowering.
  • Light schedule: 19 hours on / 5 hours off.
  • Nutrients: GH Flora Trio (FloraMicro, FloraGro, FloraBloom), also using CalMag and HydroGuard.
  • Temps / Humidity: Temps are consistently at 70-75 degrees during the day and mid-60's at night. Humidity currently hovers around 50% but I expect that to drop into the 20's-30's as the colder season approaches.
  • Seed placed in net pot on 08/06/2017
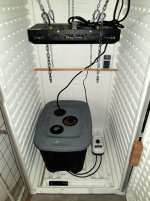
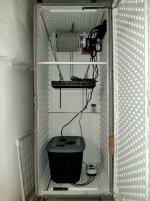
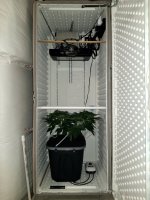
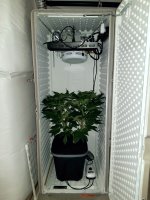
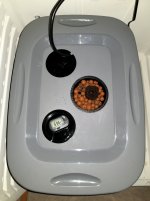
Due to the constraints of my cabinet, I had to look high and low for a reservoir that would hold enough water yet fit within the floor-print of my box. Due to my limited height, I will be using a combination of topping and an adjustable SCROG net to main-line her into eight mains before flipping to flower. And since I have no intentions of growing more than one plant at a time, my reservoir lid only has three cutouts, one for the net pot and two for access / servicing.

Wish me luck as I am one nervous SOB. I hope this goes well and I can avoid any major screw-ups.
 

Attachments
  • photo26372.jpg
    photo26372.jpg
    1.4 MB · Views: 1
  • photo26373.jpg
    photo26373.jpg
    1.6 MB · Views: 1
  • photo26371.jpg
    photo26371.jpg
    1.5 MB · Views: 0
Last edited:
No Title

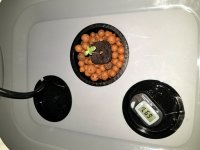
Well, not much to report this week other than I have LIFE!

I sowed the seed on Saturday and I guess my expectations were too high to start as she didn't pop the surface of the rapid rooter until Thursday (5 days later).

Although I didn't need to, I went ahead and did a reservoir change last night just so I can get into the habit of doing it and establishing a routine while dialing in nutrients / mixing levels.

If anyone is interested, here is a summary of the strain:

Berry Bomb by Bomb Seeds - Berry Bomb is a special cross of a hand selected Blueberry mother with the all powerful Bomb #1 father. The result is outstanding; think Blueberry, but bigger yields, more THC and we think a better taste.The influence of our Bomb #1 strain gives Berry Bomb explosive growth while making the strain much easier to grow (both indoors and out) and easier to trim than the original. This strain produces a fat dominant single kola with large internodal distances and the characteristic explosive bomb upward growth. This is an excellent choice for SCROG. Indoors the plant will stay of medium height but outdoors this beauty can get huge. Like most purple/blue strains, Berry Bomb will turn blue under correct conditions (i.e. cooler, lower temperatures at night). It is considered to have good mold resistance. At harvest, buds are super frosty with a sweet berry perfume and taste. Delivering a classic indica high with some sativa qualities thanks to the Blueberry mother it won't lay you out for the count.
 

Attachments

  • photo26921.jpg
    photo26921.jpg
    1.7 MB · Views: 1
No Title

Hi folks,

Day 21 and it's time I made an update to this journal.

Things have not been going as well as hoped. I knew there would be some growing pains since this is my first attempt at a DWC, but sheesh, what a PIA this past 10 days has been.

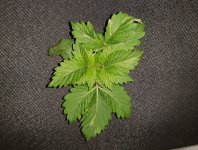
The leaves on my plant have been coming up all twisted and somewhat discolored. Although some of the symptoms look like TMV, I don't see how I could have picked up that virus in my little plant. I have no other live plants in the house. I've been sticking to my nutrient schedule and as far as I was able to determine, I thought everything was dialed in. Yet, I could not come up with an explanation for what might have been causing these plant deformities.

Then today, while attempting to calibrate my PH meter prior to a reservoir change, it essentially took a crap on me and I ended up chuking it in the trash. I just could not get it calibrated and I wonder now if it was the source of my problems. In any case, I now have a spankin new Blue Labs PH meter. For $80, I sure hope it is reliable and was worth the cost.

So I just got done doing a reservoir change, PH'ing my nutrient-filled water to 5.8.

Another thing I did was buy a piece of neoprene rubber. I felt the plastic lid of my reservoir was a little bit on the thin side and I wanted to be absolutely sure there was no light getting into the tub. So now that I have that black piece of neoprene on top of the lid, I have no doubt that it's dark in that tub.

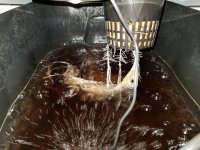
One other thing I did today was remove the water pump that was feeding the net pot. There are lots of roots from the pot well down into the water with more roots appearing every day.

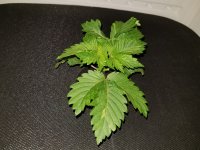
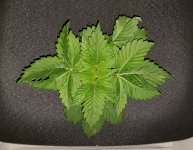
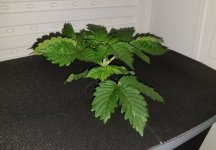
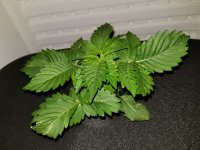
The new leaves coming in don't appear to be as twisted and deformed as the previous ones. Hopefully, with my PH now in check, I'll see a bit of recovery in my little plant this week. Wish me luck.
 

Attachments

  • photo27809.jpg
    photo27809.jpg
    2.4 MB · Views: 1
  • photo27810.jpg
    photo27810.jpg
    2.1 MB · Views: 1
That's the very reason I double check with drops once a week and anytime something doesn't seem right, such as no fluctuation in PH from one day to the next or the flux seems to much one way or the other. I love my digital pens and use them daily, but I keep an eye on their accuracy.

Glad you found the issue!

Love to hear how the Blue Labs does, I have an eye on the handheld probe one that does temp/ph/ppm all in one unit but haven't decided yet.
 
No Title

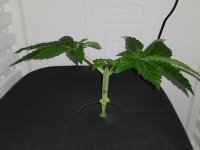
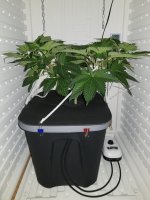
Well, even though it's only been a few days since my last update, I thought I'd post some pics of my baby today showing how she has responded since my PH problems of last week. She has four true nodes now, working on her fifth. It won't be much longer until I top her down to the third node.
 

Attachments

  • photo28060.jpg
    photo28060.jpg
    2.5 MB · Views: 0
  • photo28061.jpg
    photo28061.jpg
    1.7 MB · Views: 0
  • photo28062.jpg
    photo28062.jpg
    1.7 MB · Views: 1
  • photo28063.jpg
    photo28063.jpg
    1.8 MB · Views: 1
No Title

Good morning GWE peeps and fellow cannabis warriors,

It's day 32 and time for an update.

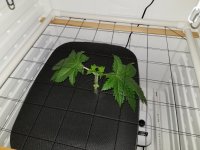
For the past week she has been growing like a weed! The PH problems of two weeks ago are a distant memory and she has really rebounded. So much so, that today it was time for her first topping.

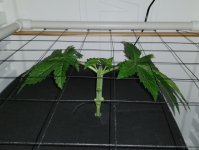
Prior to topping, she had five strong nodes and was working on the sixth. I've intentionally kept my light low to minimize plant height as much as possible. As a result, the nodes stacked very nicely and close together.

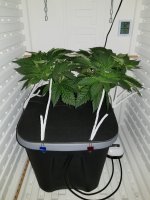
As mentioned at the top of this journal, I will be doing a "traditional" main-line on her and she'll eventually have eight mains or tops. To train her into the low, flat canopy that so many desire, I will be using an "adjustable" scrog net to push the branches down (instead of pulling them down with string or plant ties). Note how my grow cabinet has equally-spaced ribs on each side. What I did was cut two pieces of thin wood into slats that fit within these ribs. I then constructed my scrog net out of PVC pipe which I then lay on top of the slats. Now, as the plant grows and adds nodes onto her mains, I can adjust the height of my scrog net as needed. Since I'm limited in height, it's important that I keep the canopy as low as possible until it's time to put her in flowering mode. The adjustable scrog net will help me achieve just that.

I expect her to be a little stunted after today's cutting, but part of me hopes that she'll just take it stride and continue her explosive growth.
 

Attachments

  • photo28519.jpg
    photo28519.jpg
    1.3 MB · Views: 1
  • photo28520.jpg
    photo28520.jpg
    1.3 MB · Views: 2
  • photo28521.jpg
    photo28521.jpg
    1.6 MB · Views: 1
  • photo28522.jpg
    photo28522.jpg
    1.5 MB · Views: 1
No Title

So glad to see the GWE forum back up and running. Props to Nebula and her team for all the work that was put in.

Wow, almost a month since I posted to my journal, and things are going well.

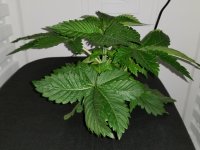
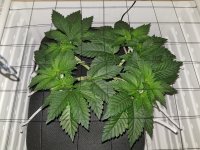
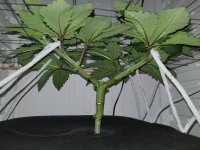
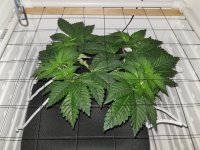
In the past month, I've topped my little plant two more times and she is now sporting eight tops or mains, although they are a little on the small side still. She received her last & final topping a week ago today.

I've been using a combination of my scrog net and tying down branches (using pipe cleaners).

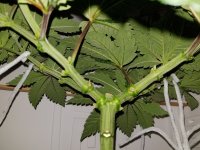
With this heavy indica-leaning strain (Berry Bomb), I've found that as new shoots come up, they quickly thicken and become hard to bend. Hence the reason for the pipe cleaners. As soon as the new shoots approached about an inch in length I pulled them down with the pipe cleaners while they were still soft enough to bend. You can look at the pics and see how thick those branches are.

From here, it's just a matter of keeping those mains spreading out a bit more before I allow them to start growing upwards again.
 

Attachments

  • photo28904.jpg
    photo28904.jpg
    2 MB · Views: 2
  • photo28905.jpg
    photo28905.jpg
    1.5 MB · Views: 1
  • photo28906.jpg
    photo28906.jpg
    1.9 MB · Views: 1
Last edited:
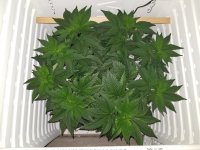
No Title

Day 67 since planting.

Not a whole lot happening, just steady as she goes.

She is drinking more and more water. Had to add a gallon of RO water to the reservoir today to replace the gallon she drank since Sunday.

Been doing a little defoliation here and there; I'm only pulling leaves where they are "stacking" on top of each other. When they stack like this, water accumulates between the leaves which can lead to other problems. By keeping the stacking to a minimum, I can ensure air continues to flow around and through the leaves.

At this point, I think I've spread the eight mains out pretty good and I can start letting them grow upwards instead of out at an angle. A few more weeks and I can flip to flower.
 

Attachments

  • photo29490.jpg
    photo29490.jpg
    1.9 MB · Views: 1
  • photo29491.jpg
    photo29491.jpg
    1.7 MB · Views: 1
  • photo29492.jpg
    photo29492.jpg
    1.3 MB · Views: 1
Last edited:
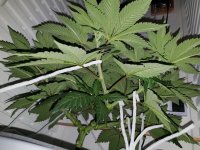
Good morning, fellow growers. It's Day 75 and time for my weekly update.

All is going well with no apparent issues. She continues to reach upwards now that she has been carefully manifolded into eight mains. Today, I added another gallon of RO water to the reservoir to replace the gallon she drank since Sunday. Not much defoliation this week, maybe three or four large fan leaves to prevent the stacking and water condensation mentioned in an earlier post. I am also making sure to remove any off-shoots a couple of days after they appear and I can pinch them off without damaging other areas of the plant; I don't want any "straggler" branches other than the eight mains. I want to see another six to eight inches in growth before I flip her to flower. Until then, steady as she grows!
 

Attachments

  • photo30054.jpg
    photo30054.jpg
    642.5 KB · Views: 0
  • photo30055.jpg
    photo30055.jpg
    604.8 KB · Views: 1
  • photo30056.jpg
    photo30056.jpg
    733.4 KB · Views: 0
  • photo30057.jpg
    photo30057.jpg
    878.4 KB · Views: 1
The top-feeding is used in the beginning of the grow to pump nutrients and oxygenated water up to and down through the net pot. This encourages rapid growth of the seedling in the first few weeks of life. Once the roots of the seedling have reached the water in the reservoir below, you can remove the top-feed pump & tubes. However, a lot of growers leave the top-feed going the entire grow although it no longer really provides much benefit.

I pulled my top-feed pump & tubes at 21 days into this particular grow.
 
Good morning, fellow growers! It's day 83 and time for an update.

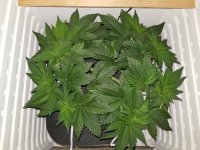
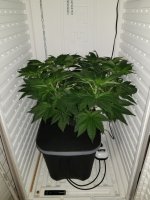
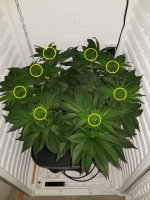
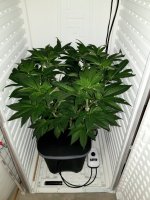
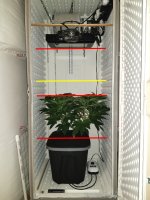
As you can see from the pics, "Bubbles" has spread out to the point that fan leaves from all eight mains are brushing the sides of my 2.5 x 2.5 foot cabinet. In the top-down pic, I've indicated the eight tops.

At this point, I need to start thinking about when I want to flip to flowering mode. In my experience, my plants have grown another 50% to 75% in height during the initial flowering stretch. As you can see from the straight-on cabinet pic, the plant is reaching higher & higher each day. My plans are to make the switch once the tops have grown another 4 or 5 inches in height. The red lines indicate the lowest point of the plant (basically, the lid of the reservoir) as well as the highest point that I can hang my lights at. That gives me the overall height I have to work with. The yellow line indicates the approximate height I want the tops to get to before I make the switch to flowering mode.

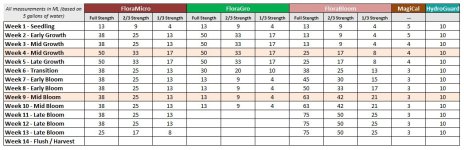
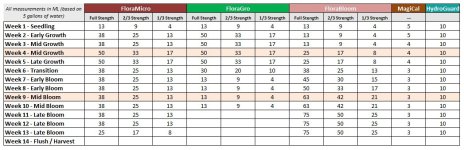
Since this is my first DWC grow, I've scoured the internet looking for tips, tricks, and discussions surrounding DWC. One of the things I was expecting to see was my PH to drift up as the plant drinks water / consumes nutrients between reservoir changes. So far, I've been finding the opposite to be happening; my PH drops every single day and I have to use PH-Up to bring the PH back up into the 6.0 range. In fact, in the past 24 hours, my PH went from 6.3 to 5.5. She is currently drinking about a 1/2 gallon each day and based on what I've been able to find on the 'net, if PH drops while water level drops, that's usually an indication that the plant is drinking more water while consuming less nutrients. Up until now, I've been feeding nutrients at 2/3 strength (based on GH's online feed schedule calculator). When I do the reservoir change this coming Sunday, I'll reduce my nutrients to about 1/2 strength and see if the PH remains a bit more stable.

I'd appreciate any comments or suggestions. Thanks for watching.
 

Attachments

  • photo30612.jpg
    photo30612.jpg
    638.4 KB · Views: 2
  • photo30613.jpg
    photo30613.jpg
    594.8 KB · Views: 2
  • photo30614.jpg
    photo30614.jpg
    686 KB · Views: 1
  • photo30615.jpg
    photo30615.jpg
    117.4 KB · Views: 2
Good morning, folks.

Day 91 - FLIP TO FLOWER!

Big day today. Flipped the grow light to 12/12. Changed out the reservoir, transitioning my nutrients from veg to bloom.

I rearranged my lights a little bit, moving the full-spectrum light to the front of the cabinet where I have a little more height to work with. Also hung the UFO red-spectrum LED light but will not plug it in until next weekend after the plant has adjusted a bit to the new environment.

My only concerns at this point:

(1) I don't have a great deal of free space left in the cabinet. I'm worried that the flowering stretch might be a bit much. If I find my tops getting too close to the lights, I plan to employ a little bit of "back-building" to the buds. You can google it, but essentially what you do is snip off a little bit of the very top of the bud. This will stop / slow-down the upward growth. In turn, this will cause the buds to fatten / swell more. At least that's the theory behind it. Having never done it before, I'll just have to wait an see what happens.

(2) Throughout my veg cycle, I found that I needed to add PH-Up on an almost daily basis (1ml to 2ml a day). Based on my own research, I found this to generally mean one of two things: either I have a root-rot issue or the plant is drinking more water than consuming nutrients. Since I do not appear to have root-rot, I'm assuming I've been feeding too much nutrients (2/3 strength strength based on GH recommendations). So I cut back my nutrients this week to 1/3 strength. My concern here is that plants become very temperamental during flowering as far as nutrients go. I'm worried that I'll run into problems if I don't get these nutrient levels dialed in so I'm not using so much PH-Up. I guess all I can do is continue checking PH twice daily, adjusting as needed.

I think I'm gonna hit the hydro store today and peruse their tents. I think I need to go to a larger growing space going forward. Maybe I'll get a nice new grow tent for Christmas!
 

Attachments

  • photo30615.jpg
    photo30615.jpg
    117.4 KB · Views: 1
  • photo31215.jpg
    photo31215.jpg
    701.9 KB · Views: 0
  • photo31216.jpg
    photo31216.jpg
    661.5 KB · Views: 0
Last edited:
Back
Top