Announcement

Collapse
No announcement yet.

SIP System?

Collapse
X
 
  • Filter
  • Time
  • Show
Clear All
new posts

    SIP System?

    Hi GWE community!
    i found out last week, that i got the promotion from my job that i wanted!!!!! YAY! now upon further thinking i realize i won"t have much time to take care of my babies as i used too
    (new position requires lots of traveling) so, i got me a LED light, cause i prefer CFL but, more maintenance and no time.
    so, i started researching and found out about SIP method, this will keep my plants watered with little effort and for some time, right?
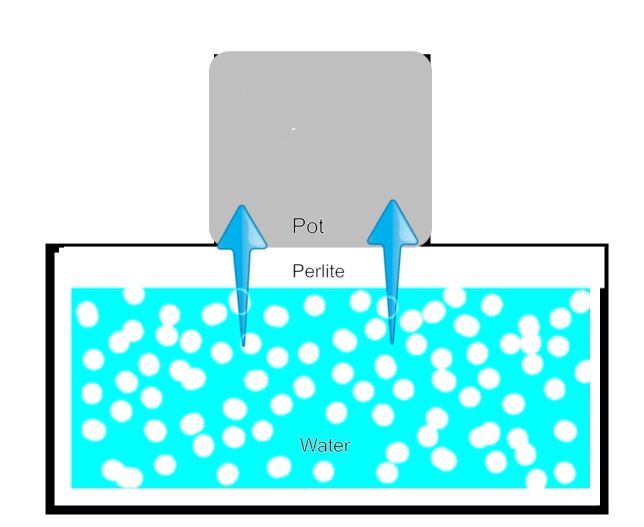
    now from what i understand from my research is, a bucket or a tray filled with perlite and water, with one inch of space between the water and the pot that sit on top of perilite?
    and how do i know when to refill the pot with water if the perlite is covering it?
    do i use some kind of fabric between the perilite and the pot? and how deep should my reservoir be?
    i am using four 2 gallon fabric pots, under led and cfl with rots organic and ffof soil and ff trio nutes.


    i would love to see some pictures of a SIP setup that some of you guys are using so i can get an idea of what im working with. or please. a tutorial someone can point me to.

    thanks
    #2
    Hi, all that read this post, I found a simple solution to my Question.... above i named the system SIP, which actually it is called a SWICK System that i was looking for.

    basically, in my setup, (which i Dont have setup yet, waiting for my 1020 tray to arrive) i will be using a 1020 tray (black nursery plant tray with no holes, and measures 10x20)
    fill it with Perlite and water to about 1 inch below the pelite, and sit the pot on top of the perlite, this system work with all kinds of pots, But, the SWICK Setup works best with the fabric smart pots.
    (Credit goes to NOOBWANNB for this)


    as for me i will be trying this with the superroots air pots that are made from hard plastic and my own organic soil mix. as soon as my tray arrives i will post pics of my setup.....

    Comment


      #3
      Cool idea. Have you found others who have done it on other sites? One might suspect that organic soil won't wick the water well enough for bottom feeding, but will just keep the bottom of the roots wet, making root root likely. It might require amending your soil with extra perlite and Coco.

      You might want to set a dry smart pot of soil into the perlite and see how long it takes for the top to get moist. Then let it get really dry before refilling.

      Along the same lines, have you seen autopots? Some people here are using the blumat.
      Nothing is foolproof for the sufficiently talented fool.

      Comment


        #4
        Hi DingusKhan, yes, I have found others who do it, when I first read on it seemed Crazy to have still water sitting around in my tent. But, from what I understand, it can be done.
        not sure if I can post outside links... but the original post in 2012 on grass city by noobwannb

        "This method is especially effective with organic soil, and was designed with it in mind, but I see no reason that it wouldn't work with bagged soil. It does go against everything we've been taught about the wet/dry cycles, but with organic soil the benefit of keeping it evenly moist is huge.

        I love the health and vigor I've witnessed with a SIP (self irrigating planter) system, but have no room for 5 gallon buckets in my grow room. Frankly I like to keep my plants smallish and love the benefits of fabric pots as well, so I went looking for something that would provide the evenly moist condition for the soil (the benefit) without using large self contained buckets full of soil and came up with this. It's also noob proof since one of the easiest (and deadliest) mistakes to make is overwatering and underwatering. Anyway, here's the method."

        1. You want a tray to hold the wicking material and water. Doesn't matter what size, kind, etc...you can use a plant saucer or a plastic swimming pool or anything in between. I started using seed flat trays and have moved up in size since.
        More volume means more water/medium means less maintenance, but it's up to you. Also, the larger the tray the more pots you can fit inside.

        2. You need to fill the tray with wicking material. I use perlite and think this works best, but I've been told that lava rock, hydroton and the like works also. ROCKS, stones, and anything that is bio degradable will NOT work. The stones won't wick and you don't want to use something that will break down causing issues with mold, smells, etc

        3. Add water. I like to use an inverted water bottle so that I can gauge the water level but it's not necessary. The perlite will soak up the water so keep adding until it's at the level you want it which can be anything YOU want it to be, but I suggest at least an inch below the top of the perlite. The reason for this is you don't want your pots sitting directly in the water.
        Add your pots (simply set them down) to the top of the perlite.

        -You WILL have roots growing out of the bottom and sides if using a smartie after awhile. This is normal, and they usually dry up after awhile.
        -You MAY see white mold on top of the soil for a few days (Santa's beard) until the system regulates itself. This is a good thing and nothing to be alarmed about.
        -You may (probably will) see a slight discoloration of the top layer if using perlite. This is algae because of the damp conditions and high light. It won't hurt anything, but if it bothers you, you can either cover the top with landscape fabric, black plastic, whatever, but I don't suggest using anything between the perlite and the bottom of the pot. Either cut holes or drape it around the pot(s).

        *I now line my tray with weedblocker fabric before adding the perlite and leave a good amount of excess before cutting. After the perlite is added, I bring the excess up over the perlite and tuck it around the pots. It shades the perlite, and helps hold moisture in the tray as well....perfect.
        Once the roots start growing out the bottom, within a few days the growth up top will explode because the plant has a steady supply of good, moist living soil, and that's because the soil has a good steady supply of water.

        Enjoy!
        ---------------------------------
        * You CAN use hard pots, but smart pots work best. When you place hard pots make sure there are drain holes on the bottom of the pot, and push the pot down inside the perlite a bit so that it makes good contact with the soil through the drain holes. It's probably best to avoid moving hard pots much so that the wicking (via the drain holes) isn't interupted. You can move smart pots around as much as you like.

        * For teas and drenches, I suggest top watering outside of the tray..pull the pot out, water it with whatever and let it drain a bit before returning to the sip tray. I suggest this because imo pouring things into the res that have the potential to rot and smell doesn't appeal to me, but it is of course your choice. I found out the hard way using hydrolyzed fish ferts....not a pleasant clean up experience😉

        * Works GREAT for seed starting and cloning as well.

        ADDED: Though a common reservour (fits more than one plant) is convenient and has it's benefits, I've found one disadvantage is in taking photos....if good pics matter to you, you may want to go with individual trays.

        I challenge you to try this even if on a small scale with one plant...especially if you like smart pots. You're gonna love it😊

        ADDED: It's worth noting here that a good FLUFFY (well aerated) mix will go a long way toward the success of this system. Wet compacted soil is NOT healthy for the root systems. I currently use 1/3 by volume aeration (perlite, rice hulls, etc) then add up to 1/4 MORE when I pot up. Works VERY well for me as you can see from my rootball post harvest
        Last edited by Bklyndiaz; 05-12-2017, 03:54 PM.

        Comment


          #5
          Thanks Bklyndiaz, that's a really cool set up. I've been entertaining the same suspicion that we may a little over-protective to prevent root rot, and missing out on cool ideas like this one. I bought an AutoPot smart valve, but I'm too chicken to try it. It is also a mechanical, cyclic waterer that fills a reservoir that the smart pots just sit in, soak up, but the valve lets the plant empty the reservoir before refilling it.

          My first real soil grow is in progress, I'm going to try this.
          Nothing is foolproof for the sufficiently talented fool.

          Comment


            #6
            hey DingusKhan, i understand exactly what you mean! this setup goes against all i learned about Wet and Dry, and would have never tried this at all, but, as i stated on my first post, new promotion with lots of traveling, so, in a way i have no choice, either stop growing or quit my job!!!! neither is an option but, growers have been doing it successfully since 2012 (the time Noobwannb posted the thread, maybe longer).
            so im going to give it a shot. when i get all materials in, i will post the Swick set-up and a grow journal.

            P.S. My Swick set-up is just a ghetto version of your SIP (self irrigation pot). Good Luck

            Comment


              #7
              Hi guys! I have my SIP up and running, I setup it up last night and this morning it wicked up the water!
              I used two and a half bags of Growstone.
              Click image for larger version

Name:	20170607_103312.jpg
Views:	1775
Size:	1.05 MB
ID:	102515Click image for larger version

Name:	20170607_194411.jpg
Views:	1814
Size:	1.22 MB
ID:	102516Click image for larger version

Name:	20170607_194402.jpg
Views:	1765
Size:	1.42 MB
ID:	102517

              Comment


                #8
                Nice! Your girls look happy. How dry are you going to let the reservoir tray get before refilling? Do always keep "some" water in it, or let it dry completely out periodically
                Nothing is foolproof for the sufficiently talented fool.

                Comment


                  #9
                  Originally posted by DingusKhan View Post
                  Nice! Your girls look happy. How dry are you going to let the reservoir tray get before refilling? Do always keep "some" water in it, or let it dry completely out periodically
                  Not sure yet! It's the first day, but leaving the water full over night did not raise my pH, so I think I'm going to keep it full, up to the line I drawn on the tub, which is 1 inch below the pot.
                  it took 3 gallons of water to get that Line.
                  as of now I going to let it wick all the water it can, then leave it full.

                  Comment


                    #10
                    Hey GWE! Just thought I give an Update! Day 62 from sprout, day 50 in my Swick system, I removed them from the large swick tub, and now have them in individual swicks, 14' plant tray covered with garbage bags to avoid Algae, the move was space issues... I Now let it go One day with out water before filling swick with water.

                    Comment


                      #11
                      Hey Bklyndiaz , first off dude, well done on the promotion, I recently read an article on watering practices which is very much like you do, in the article tho they put the pot into a saucer(big black plastic ones)and poured the feed into the saucer, to be drawn up into the medium.......they filled 1" or 2" high then left it, and repeat until the water was no longer being drawn up.....but at the end they expressly stated not to leave the pot with access to water when the medium was wet enough, as the "dry" cycle would not begin and the risk of root rot(as DingusKhan said)so I think it's a great idea but IDK about leaving water lying about dude?

                      p.s after saying all that, your plants look great dude
                      Last edited by Vapo69; 07-28-2017, 04:07 AM.
                      The more I know, the better I grow.

                      Comment


                        #12
                        Thanks, well I can safely say that my SWC worked well for me! Promotion? This worked well during Flowering, about 2 weeks before harvest I removed the SWC and just gave her plain water from the top.

                        ​​​​​​​

                        Comment

                        Check out our new growing community forum! (still in beta)

                        Subscribe to Weekly Newsletter!

                        Working...
                        X